Adding Interactivity
This page will introduce you to the reactivity system used in the Dara framework. The reactivity system allows you to connect parts of your app together and enable user interaction on the UI.
As underlined by the Guiding Principles, to achieve as close to native web performance as possible, the framework only makes calls to the backend when absolutely necessary. The interactivity tools introduced in this page allow this type of performance.
The first tool is the Variable, which allow the end-user to see and interact with values in the frontend.
The second tool is the dara.core.visual.dynamic_component.py_component which allow you to use the current value of a single, or set of, Variable(s) to determine the components and layout present on a page.
Variables
In this section you will walk through some different Variable types. Variables contain values that live entirely in the frontend.
Variable
Variable is the core of Dara framework's reactivity system. It represents a dynamic value that can be read and written to by components. The state is managed entirely in the user's browser which means there is no need to call back to the Python server on each update.
from dara.core import Variable

my_first_variable = Variable()
You can give your variable an initial default value of any type:
my_variable_with_default = Variable(default='initial value')
What can you store in a Variable?
Values stored by a Variable do not have to be primitive types. They can also store JSON serializable types such as lists and dictionaries. As an example, you could store a dictionary representing application state in a single Variable:
state = Variable({
    'input_value': 'Text',
    'settings': {
        'language': 'English'
    }
})
You could then use the .get(key) method available on Variable instances to specify a piece of a more complex state to pass into components. The framework will make sure to only retrieve or update the specified part of the variable.
state = Variable({
    'input_value': 'Text',
    'settings': {
        'language': 'English'
    }
})

page_content = Stack(
    # Only `input_value` will be displayed
    Text(text=state.get('input_value')),
    # Only the specified property will be updated
    Input(value=state.get('input_value')),
    # You can chain the `get` calls to specify a sub-property to use
    Input(value=state.get('settings').get('language'))
)
A Variable can be made persistent when refreshing the page by using the persist_value flag.
For more advanced persistence and collaboration options check out the advanced guide.
You cannot extract values from or do operations on a Variable through traditional Python code.
For example, this calculation:
Variable(15) + Variable(5)
will not equal 20 and will not compile in the first place.
In the later sections of this page you will learn how to update a Variable and extract values from the Variable to perform calculations and update the frontend.
UrlVariable
UrlVariable is very similar to a normal Variable. The only difference is that its state is stored in the URL of the page
as a query parameter, rather than being stored in the memory of the client.
This is useful to i.e. preserve state across page refreshes and providing deep links.
from dara.core import ConfigurationBuilder, UrlVariable
from dara.components import Stack, Tab, TabbedCard, Text

config = ConfigurationBuilder()

# State will be stored as a query param, i.e. `...?url_value=default_value`
url_variable = UrlVariable(query='url_value', default='default_value')

page_content = Stack(
    #here selected_tab updates the state of the url_variable
    TabbedCard(
        Tab(Text('tab1 content'), title='Tab1'), Tab(Text('tab2 content'), title='Tab2'), selected_tab=url_variable
    )
)

config.add_page('Url Variable', content=page_content)
UrlVariable supports nested dictionary values with the .get(key) method just like a normal Variable.
SwitchVariable
SwitchVariable provides a powerful way to create conditional logic in your application by switching between different values based on conditions or value mappings. This is particularly useful for implementing if/else logic, status mappings, and dynamic content selection without requiring backend calls.
A SwitchVariable evaluates reactively - whenever its input variables change, it automatically recalculates and updates dependent components. This makes it perfect for creating responsive UIs that adapt to user input or application state.
There are two main patterns for creating SwitchVariables:
Boolean Conditions with SwitchVariable.when()
The when() method is ideal for simple if/else logic where you want to switch between two values based on a true/false condition:
from dara.core import ConfigurationBuilder, Variable, SwitchVariable
from dara.components import Stack, Text, Button, Card

config = ConfigurationBuilder()

# User authentication state
is_logged_in = Variable(default=False)

# Switch between different UI messages based on login status
welcome_message = SwitchVariable.when(
    condition=is_logged_in,
    true_value='Welcome back! You are logged in.',
    false_value='Please log in to continue.'
)

# Switch between different button text
button_text = SwitchVariable.when(
    condition=is_logged_in,
    true_value='Logout',
    false_value='Login'
)

# Complete authentication component
page_content = Card(
    Stack(
        Text(text=welcome_message),
        Button(text=button_text, onclick=is_logged_in.toggle())
    ),
    title='Authentication Demo'
)

config.add_page('Authentication Demo', content=page_content)
You can also use complex conditions with other variables:
from dara.core import Variable, SwitchVariable, ConfigurationBuilder
from dara.components import Stack, Text, Input, Card

config = ConfigurationBuilder()

# Temperature-based clothing advice
temperature = Variable(default=20)
advice = SwitchVariable.when(
    condition=temperature > 25,
    true_value='Wear light clothes - it\'s warm!',
    false_value='Wear warm clothes - it\'s cool!'
)

# Complete weather advice component
weather_component = Card(
    Stack(
        Text('Enter temperature (°C):'),
        Input(value=temperature, type='number'),
        Text('Advice:'),
        Text(text=advice)
    ),
    title='Weather Advice'
)

config.add_page('Weather Demo', content=page_content)
The base variable type overrides the __eq__ and other comparison operator methods to return a Condition object. In the above example we compare the temperature variable to the number 25, which returns a Condition object that the SwitchVariable understands how to evaluate whenever your Variable changes.
Value Mapping with SwitchVariable.match()
The match() method is perfect for mapping specific values to corresponding outputs, similar to a switch statement:
from dara.core import ConfigurationBuilder, Variable, SwitchVariable
from dara.components import Stack, Text, Select, Item, Card

config = ConfigurationBuilder()

# User role selection
user_role = Variable(default='guest')

# Map roles to permission descriptions
permission_text = SwitchVariable.match(
    value=user_role,
    mapping={
        'admin': 'Full access to all features',
        'editor': 'Can create and edit content',
        'viewer': 'Read-only access',
        'guest': 'Limited access to public content'
    },
    default='Unknown role - contact administrator'
)

# Map roles to UI themes
theme_class = SwitchVariable.match(
    value=user_role,
    mapping={
        'admin': 'admin-theme',
        'editor': 'editor-theme',
        'viewer': 'viewer-theme'
    },
    default='default-theme'
)

# Complete role management component
page_content = Card(
    Stack(
        Text('Select your role:'),
        Select(
            value=user_role,
            items=[
                Item(label='Administrator', value='admin'),
                Item(label='Editor', value='editor'),
                Item(label='Viewer', value='viewer'),
                Item(label='Guest', value='guest')
            ]
        ),
        Text('Permissions:'),
        Text(text=permission_text),
        Text('Theme:'),
        Text(text=theme_class)
    ),
    title='Role Management'
)

config.add_page('Role Demo', content=page_content)
Advanced Usage
SwitchVariable can work with other variables as mapping sources:
from dara.core import Variable, SwitchVariable
from dara.components import Stack, Text, Select, Item, Card

# Dynamic mapping based on another variable
status_messages = Variable({
    'loading': 'Please wait...',
    'success': 'Operation completed successfully!',
    'error': 'Something went wrong. Please try again.',
    'idle': 'Ready to start'
})

current_status = Variable('idle')

# Use a variable as the mapping source
status_display = SwitchVariable.match(
    value=current_status,
    mapping=status_messages,
    default='Unknown status'
)

# Complete status display component
status_component = Card(
    Stack(
        Text('Current Status:'),
        Select(
            value=current_status,
            items=[
                Item(label='Idle', value='idle'),
                Item(label='Loading', value='loading'),
                Item(label='Success', value='success'),
                Item(label='Error', value='error')
            ]
        ),
        Text('Status Message:'),
        Text(text=status_display)
    ),
    title='Dynamic Status Display'
)
Key Serialization: When using mappings with SwitchVariable, remember that JSON object keys are always strings. The system automatically converts lookup keys to strings, so {True: 'admin', False: 'user'} becomes {"true": "admin", "false": "user"} in the frontend. Dara handles the e.g. boolean and number cases for you on a best-effort basis but it's a good thing to keep in mind in case you run into unexpected behaviour.
SwitchVariable is read-only like DerivedVariable. Its value can only change when the underlying condition or input variables change. You cannot directly update a SwitchVariable using actions or component interactions.
It should be preferred over a DerivedVariable as much as possible as it is more performant, avoiding a backend roundtrip.
Interaction Through Components
As mentioned earlier, a Variable cannot be written to with traditional Python code. However, Variables can be written to by components that enable interactivity. You were briefly introduced to these in the last section and now you will see how to use them throughout this section.
The example below shows how to use the Input component to enable input from the user. The component accepts a value, which should be a Variable instance, and will allow the user to enter free text into the field. The Input will update the value with whatever is typed into the field.
from dara.core import ConfigurationBuilder, Variable
from dara.components import Input, Heading, Stack, Text

config = ConfigurationBuilder()

my_first_variable = Variable()

page_content = Stack(
        Heading('My first input', level=2),
        Input(value=my_first_variable),
        Text(text=my_first_variable)
    )

config.add_page('Interactivity', content=page_content)
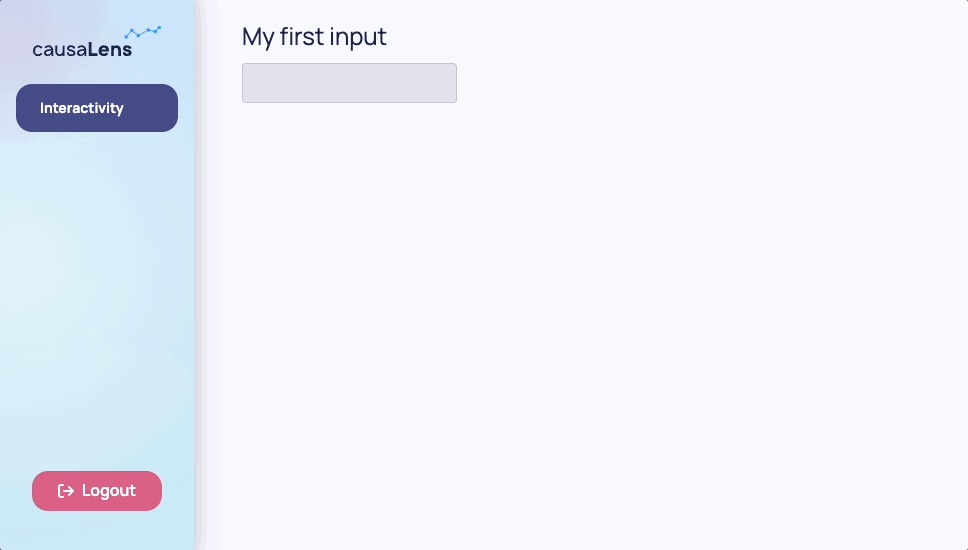
In the above example, whenever the Input field changes, it updates the value of my_first_variable and its value is displayed in the Text component. The whole process is synchronized as the value is stored entirely in the frontend so there are no calls to the Python server.
Interaction Through Actions
The components mentioned above offer a way to directly update Variables. Another way to update Variables is through actions. Actions can be found in the core framework along with Variable and they work
by being passed to a component's callback parameter. A callback is simply a function that is passed as an argument to another function.
The primary way to create actions in Dara is the @action decorator. This decorator takes a function and returns an action that can be passed to a component's callback.
It injects an ActionCtx object as the first argument of the function, which contains the input sent from the component and exposes action methods to update the state of the application.
The action methods on ActionCtx are async and must be await-ed, so your decorated function should be async as well.
To learn more about async and await in Python, check out this blogpost.
from dara.core import action, Variable
from dara.components import Select, Item

some_variable = Variable(1)
other_variable = Variable(2)

@action
async def my_action(ctx: action.Ctx, arg_1: int, arg_2: int):
    # Value coming from the component, in this case the selected item
    value = ctx.input
    # Your action logic...

    # Update `some_variable` to `value` multiplied by 2 by arg_1 and arg_2
    await ctx.update(variable=some_variable, value=value * arg_1 * arg_2)


Select(
    items=[Item(label='item1', value=1), Item(label='item2', value=2)],
    onchange=my_action(2, other_variable)
)
The example above shows how to use the @action decorator to create an action that updates a Variable with the value of the selected item in a Select component multiplied by the static 2 argument and current value of other_variable.
The @action-decorated function can take a mixture of regular Python variables and Dara Variable-based arguments in any combination. The @action decorator will automatically resolve the Variable-based arguments so your function will receive the current value of the Variable instead of the Variable instance.
The dara.components.common.button.Select component has an onchange parameter which accepts an action. A valid argument to an action parameter is one of the following three options:
- An instance of an
@action-decorated function (as in the example above). - An instance of an individual static action object.
- A list of a combination of the above two options.
Passing a list of @action-decorated functions to an action prop is deprecated and will not be supported in future versions of Dara. This is because it requires
the app to make a request to the backend server for each action in the list, which is not performant. Instead, you should use the @action decorator to create a single action
and compose them. Learn more about composing actions here.
One example of a static action object is the result of calling sync on a Variable or UrlVariable instance. This creates an action object which, when passed to an action prop,
will update the variable with the value of the input sent from the component.
from dara.core import action, Variable
from dara.components import Select, Item

some_variable = Variable()

Select(
    items=[Item(label='item1', value=1), Item(label='item2', value=2)],
    onchange=some_variable.sync()
)
The example above shows how to use the sync method to create an action that updates a Variable with the value of the selected item in a Select component.
Other interactive components like Buttons have corresponding callback parameters, e.g. onclick, onchange or similar.
In summary, to trigger an update based on user interaction simply pass an action to your component's callback. The @action decorator allows you to create
a complex action flow with multiple steps, control flow and error handling. For simpler use cases, you can use shortcuts like sync to create one-off actions for
common operations like updating a variable with the value of the input sent from a component.
To see more actions checkout the Actions.
DerivedVariable
As mentioned earlier, values cannot be extracted from Variables with traditional Python code. However, the values of a Variable can be extracted and used for calculations in a DerivedVariable.
The primary purpose of a DerivedVariable is to transform a set of raw state variables from the frontend browser into a single new derived state from a calculation on the backend server. This state can then be shared into components in the same way as other Variables. This is particularly useful for running expensive or long running tasks such as machine learning or data processing steps.
When defining a DerivedVariable, you have to specify a function and a list of Variables or other DerivedVariables to that function. Every time one of the specified variables changes, the function is re-run with the current values of the variables.
from dara.core import Variable, DerivedVariable

x = Variable(10)
y = Variable(15)
result = DerivedVariable(lambda a, b: a + b, variables=[x, y])
What is going on under the hood?
- The browser collects the state of the browser-side
Variables listed in theDerivedVariables argument,variables. It does so recursively so that you can defineDerivedVariables based on otherDerivedVariables. - The browser then sends a single request comprising of all of these states to the backend server.
- The server makes necessary calculations based on these values, again acting recursively so that if your
DerivedVariablelists anotherDerivedVariableas an input, that value will be ready for theDerivedVariablein question. - Your resolved function is executed with the final raw values so that you can perform any custom Python logic involving these values.
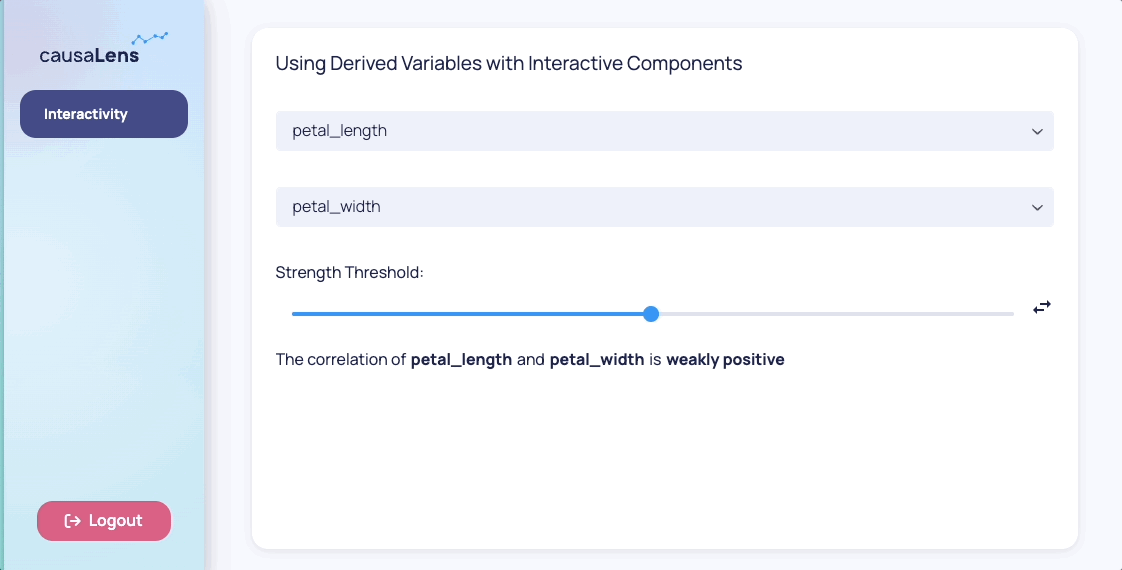
The example below will show you how DerivedVariables can work with interactive components to render dynamic output based on the user's input. The example allows the user to select which features for which they would like to calculate the correlation coefficient. The output will tell them the strength and sign of the correlation.
The features are selected with the Select component, which takes a list of items to select from and a value in which to store the selection. What is strong and what is weak is determined by the threshold that can be set via the Slider component. This component takes a domain determining the range, a step determining the increment of the slider, and values in which to store the values the slider lands on. Similar to how you made the Input component in the example previously, these values will be Variables.
import pandas
import numpy

from dara.core import ConfigurationBuilder, Variable, DerivedVariable
from dara.components import Card, Text, Spacer, Paragraph, Select, Slider, Label

config = ConfigurationBuilder()

data = pandas.DataFrame(
    {
        'sepal_length': [5.1, 4.9, 4.7, 4.6, 5.0, 5.4, 4.6, 5.0, 4.4, 4.9, 5.4, 4.8, 4.8],
        'sepal_width': [3.5, 3.0, 3.2, 3.1, 3.6, 3.9, 3.4, 3.4, 2.9, 3.1, 3.7, 3.4, 3.0],
        'petal_length': [1.4, 1.4, 1.3, 1.5, 1.4, 1.7, 1.4, 1.5, 1.4, 1.5, 1.5, 1.6, 1.4],
        'petal_width': [0.2, 0.2, 0.2, 0.2, 0.2, 0.4, 0.3, 0.2, 0.2, 0.1, 0.2, 0.2, 0.1],
    }
)

def correlation(x, y, threshold):
    corr = numpy.corrcoef(data[x], data[y])[0, 1]
    if abs(corr) >= threshold:
        strength = 'strongly'
    else:
        strength = 'weakly'

    if corr > 0:
        sign = 'positive'
    else:
        sign = 'negative'
    return f'{strength} {sign}'


selected_x = Variable('petal_length')
selected_y = Variable('petal_width')
strength_threshold = Variable([0.5])

corr_xy = DerivedVariable(correlation, variables=[selected_x, selected_y, strength_threshold])

page_content = Card(
    Spacer(),
    Select(value=selected_x, items=[*data.columns]),
    Spacer(),
    Select(value=selected_y, items=[*data.columns]),
    Spacer(),
    Label(Slider(value=strength_threshold, domain=[0, 1], step=0.1), value='Strength Threshold:'),
    Paragraph(
        Text('The correlation of '),
        Text(selected_x, bold=True),
        Text(' and '),
        Text(selected_y, bold=True),
        Text(' is '),
        Text(corr_xy, bold=True),
    ),
    title='Using Derived Variables with Interactive Components',
)

# Adding page
config.add_page(name='Interactivity', content=page_content)
There are several more advanced configuration options available on a DerivedVariable. One advanced setting is the deps parameter. This parameter gives you control over when the recalculation of the DerivedVariable happens.
The possible values are:
None: (the default) the function specified in aDerivedVariableis rerun each time any of its dependant variables change- A list of variables: (subset of all variables used by the function) the function specified in a
DerivedVariableis rerun only when these specified variables change []: the variable will only calculate its value on page load which could be useful in combination with the next advanced feature, atrigger
x = Variable(10)
y = Variable(15)

def expensive_computation(x, y):
    value = # Some complex computation...
    return value

# Only 'x' changing will trigger a re-calculation; all updates to 'y' will be ignored
result = DerivedVariable(expensive_computation, variables=[x, y], deps=[y])
In this example, result will only be recalculated when y is updated.
It is important to note that it is not possible to update a DerivedVariable directly. Its value can only be changed if one of its dependant variables changes. This is because a DerivedVariable is a read-only piece of derived state.
As shown earlier, interactive components often take functions or callbacks, called actions, as parameters to specify what should happen upon some user interaction. The DerivedVariable provides a helper method trigger which returns a ready-to-use action that forces the DerivedVariable to recalculate with the current values of its variable list.
To continue the described scenario:
x = Variable(10)
y = Variable(15)

def expensive_computation(x, y):
    value = # Some complex computation...
    return value

# result will calculate on page load
result = DerivedVariable(expensive_computation, variables=[a, b], deps=[])

# result will only be recalculated when this button is clicked
layout = Stack(
    ...
    Button('Calculate', onclick=result.trigger())
)
This feature is useful in a scenario when the computation is very expensive and takes multiple inputs. It should not be rerun every time a user changes one of the settings as you would want to group the updates together.
Tasks:DerivedVariables with Heavy CPU Calculations
DerivedVariables with Heavy CPU CalculationsCPU bound calculations are calculations that require intensive processing. Typically this will include machine learning calculations or expensive data manipulations. These calls block not only the thread they are running on, but all the other threads of the webserver as well. This is due to python's GIL (Global Interpreter Lock) and if you want to avoid this then you need to offload these calculations to separate processes, or even to another machine if you have it available. You can learn more about python's Global Interpreter Lock here.
Offloading computation to another process can get complicated fairly quickly, so Dara provides an easy way define certain functions as tasks that can be offloaded to another process outside the main one running your web app.
To use this feature you must put the definition of the DerivedVariable's resolver into a file of your choice.
def task_func(var1, var2):
    """ Mock task function """
    result = # some expensive calculation
    return result
You should then import the resolver function where you need it. You also need to set run_as_task to True on the DerivedVariable you are working with. This tells the app to spin up another process to run this function. You also need to set the task_module property on the config which specifies the name of the module where your task resolver functions are located.
from my_app.tasks import task_func
...

my_var1 = Variable()
my_var2 = Variable()
results = DerivedVariable(
    task_func,
    variables=[my_var1, my_var2],
    run_as_task=True
)

@py_component
def display_results(results):
    # Do something with the results here and return some dashboarding components based on the results.
    return Stack(
        ...
    )

config.add_page('Expensive Calculation Results', display_results(results))

config.task_module = 'my_app.tasks'
If you have long-running tasks, it helps to let the end-user know the progress through a progress bar. This utilizes the track_progress feature of py_components or is set in Dara components directly. Check out Advanced: Progress Tracking to learn more.
Alternatively, you can use the run_task action to run a task imperatively upon a user action. Check out run_task to learn more.
Variable.create_from_derived
DerivedVariables represent the result of a computation and are read-only. They can only be modified by changing one of their input variables. However, you may want to use the value of a DerivedVariableas a starting point for a mutable Variable that users can modify.
You can achieve this using the dara.core.interactivity.plain_variable.create_from_derived static method on the Variable class. It creates a new Variable instance that is initially bound to the DerivedVariable passed as an argument. The resulting Variable will be mutable, like any other Variable. At first, it will mirror the value of the DerivedVariable. Once it's explicitly modified, e.g. by a component or an action, it will stop mirroring the DerivedVariable value.
from cai_causal_graph import CausalGraph
from dara.components import CausalGraphViewer
from dara.core import DerivedVariable, Variable

def compute_causal_graph(...) -> CausalGraph:
    return CausalGraph(...)

# read-only computed CausalGraph
computed_cg = DerivedVariable(compute_causal_graph, variables=[...])

# mutable copy
mutable_cg = Variable.create_from_derived(computed_cg)

# use the mutable copy for the viewer so the up-to-date value can be used elsewhere
CausalGraphViewer(causal_graph=mutable_cg)
The example above demonstrates a common use case for Variable.create_from_derived with editor-like components. The initial value for the user to interact with, in this case a CausalGraph instance, is computed using a DerivedVariable. To make this value editable, you create a mutable copy using Variable.create_from_derived and pass it to the CausalGraphViewer. This enables the user to update the mutable_cg variable, which can also be used elsewhere to represent the current editor state, while keeping computed_cg as the original CausalGraph.
To revert the Variable back to its initial state, use the ResetVariables action to re-bind it to the DerivedVariable it was created from.
from dara.core import ResetVariables
from dara.components import Button

Button('Reset', onclick=ResetVariables(variables=[mutable_cg]))
After resetting the Variable will mirror the DerivedVariable it was created from until it is modified once more. This means that if the DerivedVariable has changed since the Variable was last bound to it, the Variable will now reflect the latest value of the DerivedVariable after the reset.
Caching
The results of a DerivedVariable are cached on the backend server. So, when a DerivedVariable is called with values of arguments it has already been called with in the past, there does not need to be a re-calculation.
There are different levels of caching that a DerivedVariable can offer and you can specify your choice in the DerivedVariable's cache argument. The different levels of caching are defined in the CacheType enumeration.
from dara.core import CacheType

results = DerivedVariable(
    task_func,
    variables=[my_var1, my_var2],
    run_as_task=True,
    cache=CacheType.GLOBAL
)
You have the following options for caching your DerivedVariables:
CacheType.GLOBAL: (default setting) calculation results are stored in a global cache across all users and are able to be reused if a calculation is invoked with the same set of argumentsCacheType.SESSION: behaves similarly toglobalwith the only difference being that calculation results are cached per sessionCacheType.USER: behaves similarly tosessionwith the only difference being that calculation results are cached per user across sessions/loginsNone: disables caching and causes theDerivedVariablecalculation to be reran every time.
Global caching enables the best performance. The further you go down the list, the more you will have your DerivedVariables being recalculated.
The trigger method takes an optional force argument specifying whether you want the forced recalculation to also act as a cache buster , replacing the values stored in the cache and essentially ignoring the caching settings specified on the variable. The default of force is True.
In addition to the cache type, you can also specify the policy to use, which determines how items are retained or evicted from the cache.The default policy is an LRU (Least Recently Used)
cache with a maximum size of 10 items (globally, or per user/session depending on the CacheType set). For a detailed explanation of the available cache policies and how to use them,
refer to Cache Policies Documentation.
py_component
The py_component function is a decorator and is the primary method of creating a dynamic layout based on the current state of an application's variables.
It is similar to a DerivedVariable in that it is a derived state from the backend server based on the values in the frontend. It is different though in that it returns a component to render in the frontend instead of just a value.
The decorated function can take a mixture of regular python variables and Dara Variable-based arguments in any combination.
This flexibility makes it ideal for creating reusable visual components to use within your application.
Similar to DerivedVariables, any py_component-decorated function will only be rerun when one of its input variables changes.
@py_component
def FormattedNumber(number: int, symbol: str):
    # number is a regular value here
    formatted = f'{symbol}{number}.00'
    return Text(text=formatted)

number_variable = Variable(20)
symbol_variable = Variable('$')

config.add_page('First Page', FormattedNumber(number_variable, '£'))
config.add_page('Second Page', FormattedNumber(150, '£'))
config.add_page('Third Page', FormattedNumber(number_variable, symbol_variable))
What is a python decorator?
Decorators allow you to add new functionality to an existing object without modifying its structure.
If you have the following function:
def calculate_ratio(numerator: int, denominator: int):
    return float(numerator) / float(denominator)
You can define a decorator which wraps the function passed into it and makes it a percentage by multiplying it by 100.
def make_percent(function):
    def wrapper():
        result = function()
        return f'{result * 100}%'

    return wrapper
The decorator takes a function as an argument so you can do the following:
calculate_percent = make_percent(calculate_ratio)
calculate_percent(5, 10)

>>> 50%
This is a valid way to decorate a function but python provides an easier way to apply decorators with the @ symbol before the function you want to decorate.
@make_percent
def calculate_ratio(numerator: int, denominator: int):
    return float(numerator) / float(denominator)

calculate_ratio(5, 10)

>>> 50%
You can learn more about decorators in python's docs.
What is going on under the hood? The py_component decorator is extracting the values out of the Variables or DerivedVariables that were passed into it so you can work with the raw values and perform logic with them.
A py_component decorator can also be configured to specify:
- A
fallbackcomponent to render whilst waiting for the component to be rendered. See Loading States for more information. - A
polling_intervalcausing the component to poll the backend and refresh itself everynseconds - A
track_progressflag to indicate whether progress tracking is enabled or not, defaulting toFalse. This is turns the fallback component into a progress bar if the component is waiting for a long-running task to complete. See Progress Tracking for more information.
You only need a py_component if you need to extract the values from Variables for rendering a dynamic layout based on the value in the Variable. You do not have to unwrap Variables if you just want to pass them to a component that accepts variables directly like Text.
You should abstract any heavy logic in a py_component logic to a DerivedVariable when possible for better performance and code structure. Check out Best Practices: Light PyComponents to learn more.
DerivedVariable vs py_component
It may be that you are unsure of which to use, and the answer may often be a combination of both!
DerivedVariable and py_component are similar in the way that they both will calculate something based on other Variable-type values.
The key difference is that a py_component returns a component whereas DerivedVariable is used to recalculate a value.
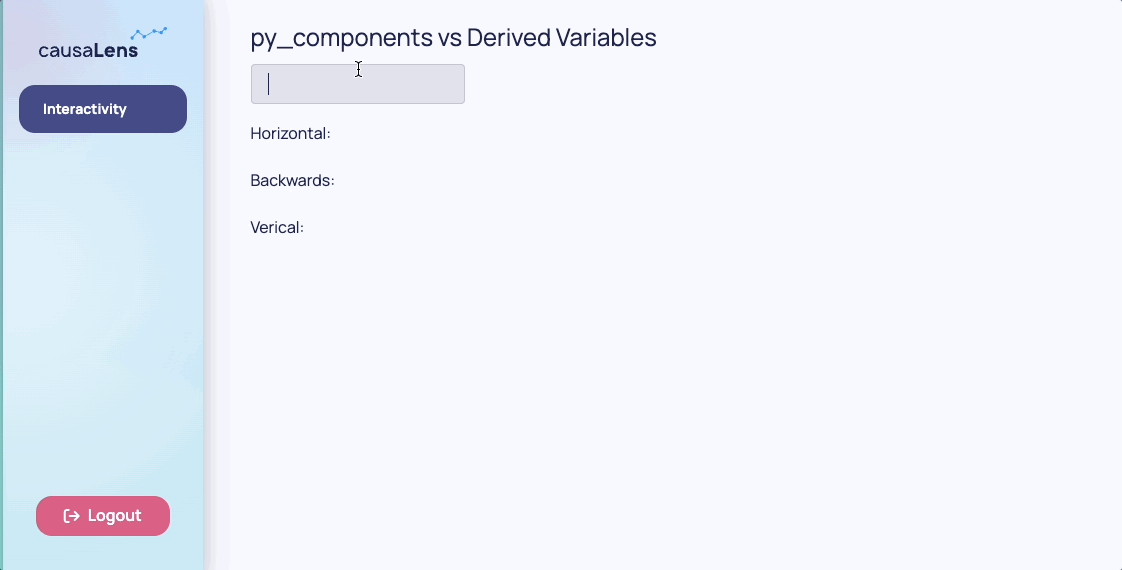
The example below is aimed at illustrating how these might work together. The user will input some text, stored in a Variable called input.
from dara.core import ConfigurationBuilder, Variable
from dara.components import ComponentInstance, Heading, Input, Stack, Text

# config
config = ConfigurationBuilder()

user_input = Variable('')


def page_content() -> ComponentInstance:
    return Stack(
        Heading('py_components vs Derived Variables', level=2),
        Input(value=user_input),
    )


config.add_page(name='Interactivity', content=page_content())
You will be tasked with displaying input horizontally, vertically and backwards, displaying how and when to use DerivedVariable and py_component:
- Horizontal
This is the simplest case. You just need to show the Variable value as is.
...

user_input = Variable('')

def page_content() -> ComponentInstance:
    return Stack(
        Heading('py_components vs Derived Variables', level=2),
        Input(value=user_input),
        Stack(Text('Horizontal:'), Text(user_input), direction='horizontal'),
    )

config.add_page(name='Interactivity', content=page_content())

- Backwards
To display the text backwards you need to transform the string. This involves changing the value of the string so in this case you would use a DerivedVariable.
from dara.core import Variable, DerivedVariable
...

user_input = Variable('')
backwards_input = DerivedVariable(lambda text: ''.join(reversed(text)), variables=[user_input])

def page_content() -> ComponentInstance:
    return Stack(
        Heading('py_components vs Derived Variables', level=2),
        Input(value=user_input),
        Stack(Text('Horizontal:'), Text(user_input), direction='horizontal'),
        Stack(Text('Backwards:'), Text(backwards_input), direction='horizontal'),
    )

config.add_page(name='Interactivity', content=page_content())

- Vertical
In this case you will choose to loop through each letter of the input text and add each letter as a separate Text component so that they can be placed vertically in a Stack. Because you want a varying layout, you must use the py_component-decorator.
from dara.core import Variable, DerivedVariable, py_component
...

user_input = Variable('')
backwards_input = DerivedVariable(lambda text: ''.join(reversed(text)), variables=[user_input])

@py_component
def my_py_component(input_str: str) -> ComponentInstance:
    # returns a varying component based on the input Variable
    vertical_text = Stack(padding='50px')
    for letter in input_str:
        vertical_text.append(Text(letter))
    return vertical_text

def page_content() -> ComponentInstance:
    return Stack(
        Heading('py_components vs Derived Variables', level=2),
        Input(value=user_input),
        Stack(Text('Horizontal:'), Text(user_input), direction='horizontal'),
        Stack(Text('Backwards:'), Text(backwards_input), direction='horizontal'),
        Stack(
            Text('Verical:'),
            my_py_component(user_input),
        ),
    )

# Adding page
config.add_page(name='Interactivity', content=page_content())
Architecture Summary
As mentioned in the introduction, Dara enables a close-to-native web app performance by offloading as much logic as possible into the browser. This optimization results in the app not needing to call into the server every time you want to change something on the screen.
This close-to-native performance is achieved by the concepts in this page. Variables are updated in the frontend browser so they do not require server involvement. Server-side logic is handled by DerivedVariables and py_components with the main difference being DerivedVariables are a derived state that represent a value while py_components are a derived state that represent a component to be rendered in the frontend. DerivedVariables are also better equipped to handle computationally expensive tasks.
As mentioned, DerivedVariables and py_components unwrap Variables to expose their values. This has some caveats due to the architecture. Check out Best Practices: Retaining Correct Variable Types to learn more.
Next Steps
So far you have learned how to handle your app's information and interactivity. A common source of information within an app is a dataset. Within the Dara framework, there are special kinds of variables to optimally handle datasets. You will learn about those in the next section.