2 posts tagged with "design"

View All Tags

· 9 min read
Patricia Jacob
Seojin Park

Introduction

In the previous blog post of the series you learned how to go from an idea to a wire frame of an app. Now it is time to take it into the next step, if you already have an initial design or existing app what are things to look out for and make it better? Here you will cover some simple tips and tricks to make your apps more user friendly. To “wow” the user with a seamless and intuitive experience with only a few basic principles kept in mind.

Design principles that you can relate

There are numerous design principles such as Neilsen’s 10 design heuristics, Schneiderman’s 8 golden rules and Norman’s design principle but not every principle is relevant to applications that aim to showcase the models that are heavy on data visualisation. Instead of going through all the principles and rules, this blog post will introduce you to the juicy ones that you can apply to your own app right away to impress the user with stellar design.

A good design is consistent

Good design should always be consistent,
And so you must be persistent,
To create a userflow that's easy to pursue,
Within a layout that will sure shine through.

Consistency is the key to good design. For example, most web pages that have a search bar place it at the top of the page. As a user even without thinking, if you want to search for something that is where your eyes will go to. Now imagine a website that has it at the bottom, for some people it might not make a difference, but many will likely miss it. Users don't want to work hard to use an app, it should "just work" for them.

Consistency must also hold true within your work. Another example: you have multiple modals, pop-ups that require user input, with submit buttons. If they are often changing between the right side and left side, and/or changing colours. This will likely lead to misclicks, how often do you really read a button rather than just skim read it? Keeping it consistent will reinforce what the user expects, and so avoid unnecessary frustration.
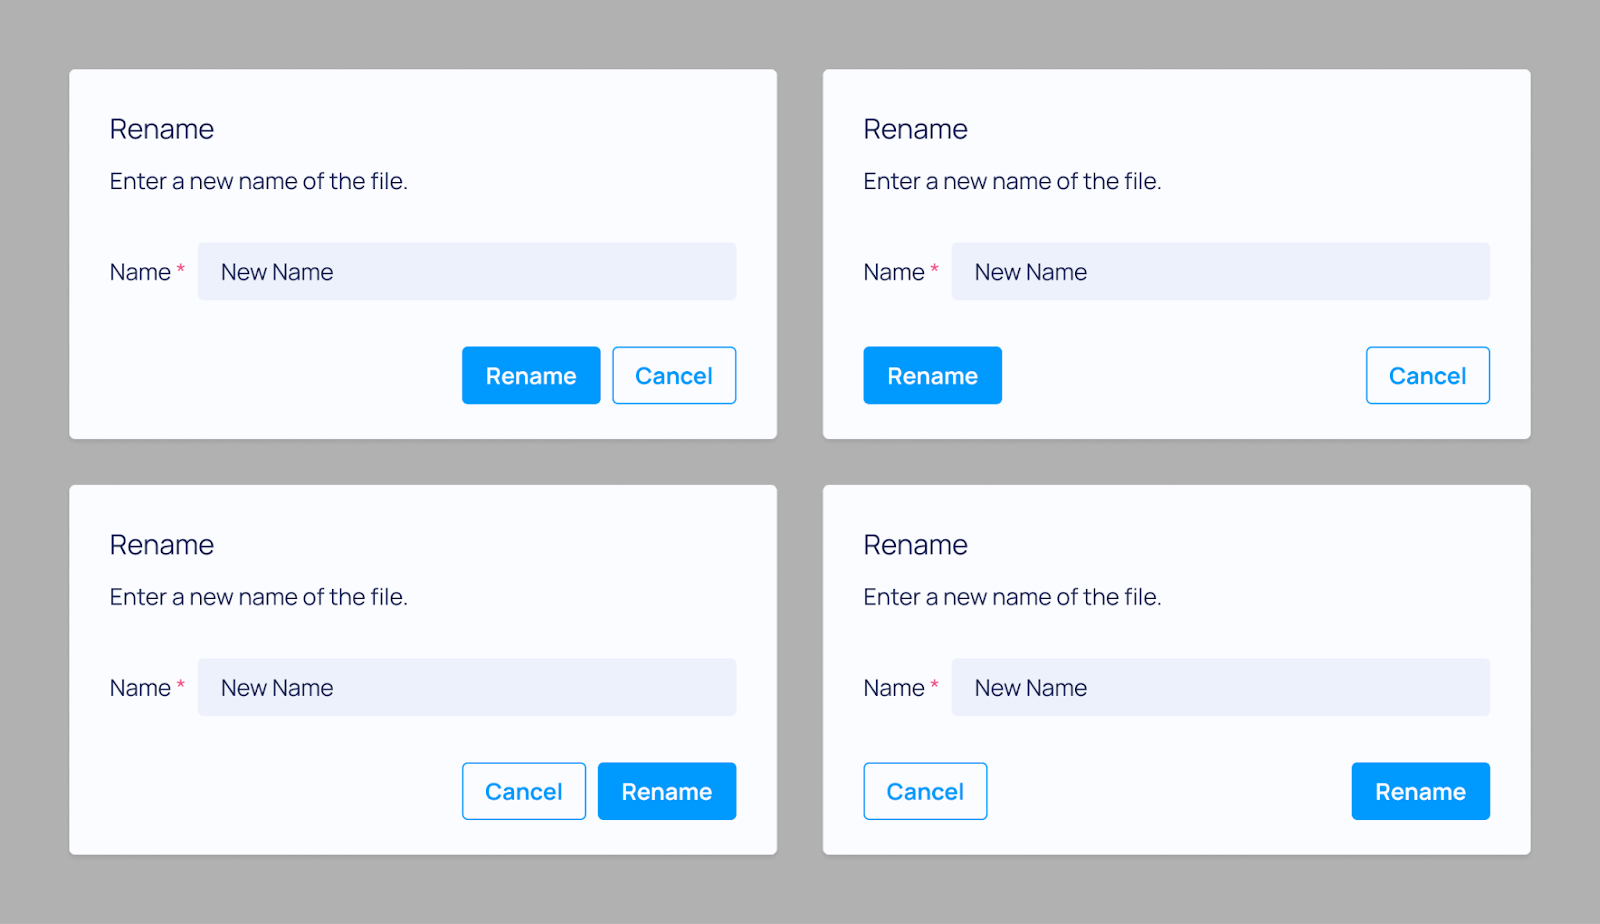
Modal Example

Using a certain hue of red for errors, and a certain font size for important information, these consistencies can be immensely powerful in helping you to tell the right story, bringing their attention to key facts and actions.

A good design follows visual hierarchy

Visual hierarchy is a powerful tool to guide the user to focus on important contents thus reducing the cognitive load and enhancing the user experience. There are several principles regarding visual hierarchy but the most relevant ones are about location, space, colour and size.

Firstly, location effectively indicates the structure of an interface. Specifically, areas divided by lines of the same direction - either vertical or horizontal - imply that they are highly related to each other. Therefore, if several items are highly relevant to each other, they should be laid in parallel.

Additionally, within the same hierarchical level, important or foremost contents should be placed on top and/or left. This is because most human eyes move from top to bottom and left to right as they are used to reading in the same trajectory. (This, in other words, might not be true in different script cultures such as Arabic.) Therefore, it is natural to position input on the left and output on the right and summary on the left and explanation on the right. By locating the contents appropriately, it becomes much easier to perceive the necessary information thus enhancing the delivery of the information.
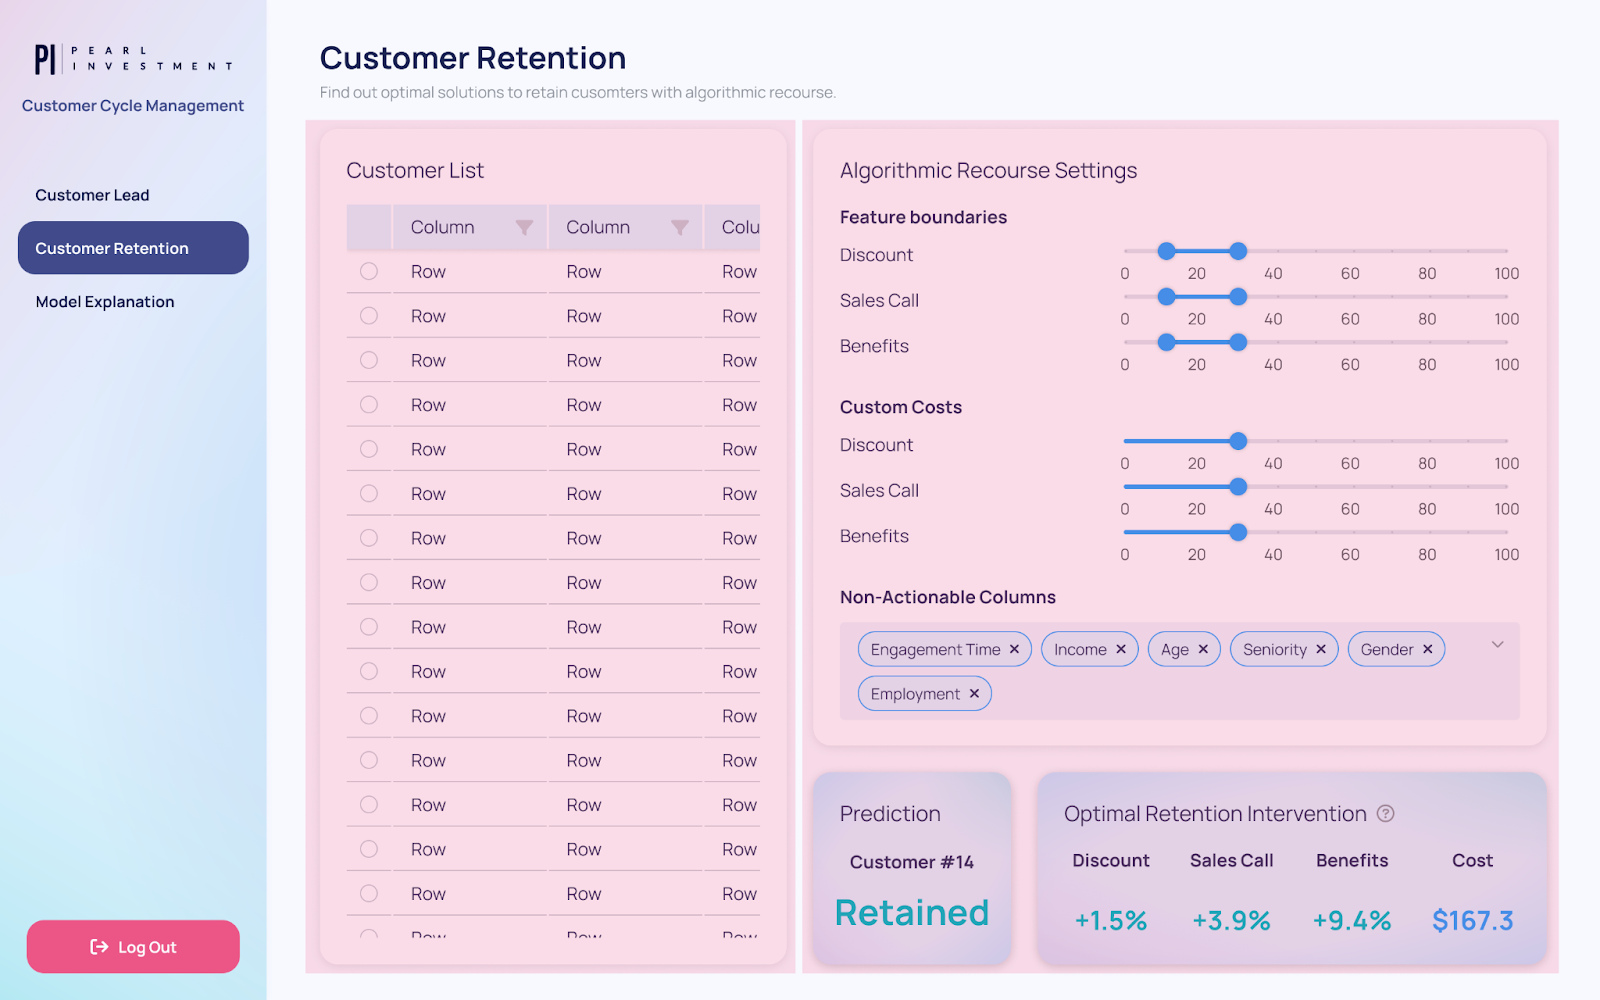
Page split bad example

[Not good] The page is split into 2 vertical areas with incoherent criteria.
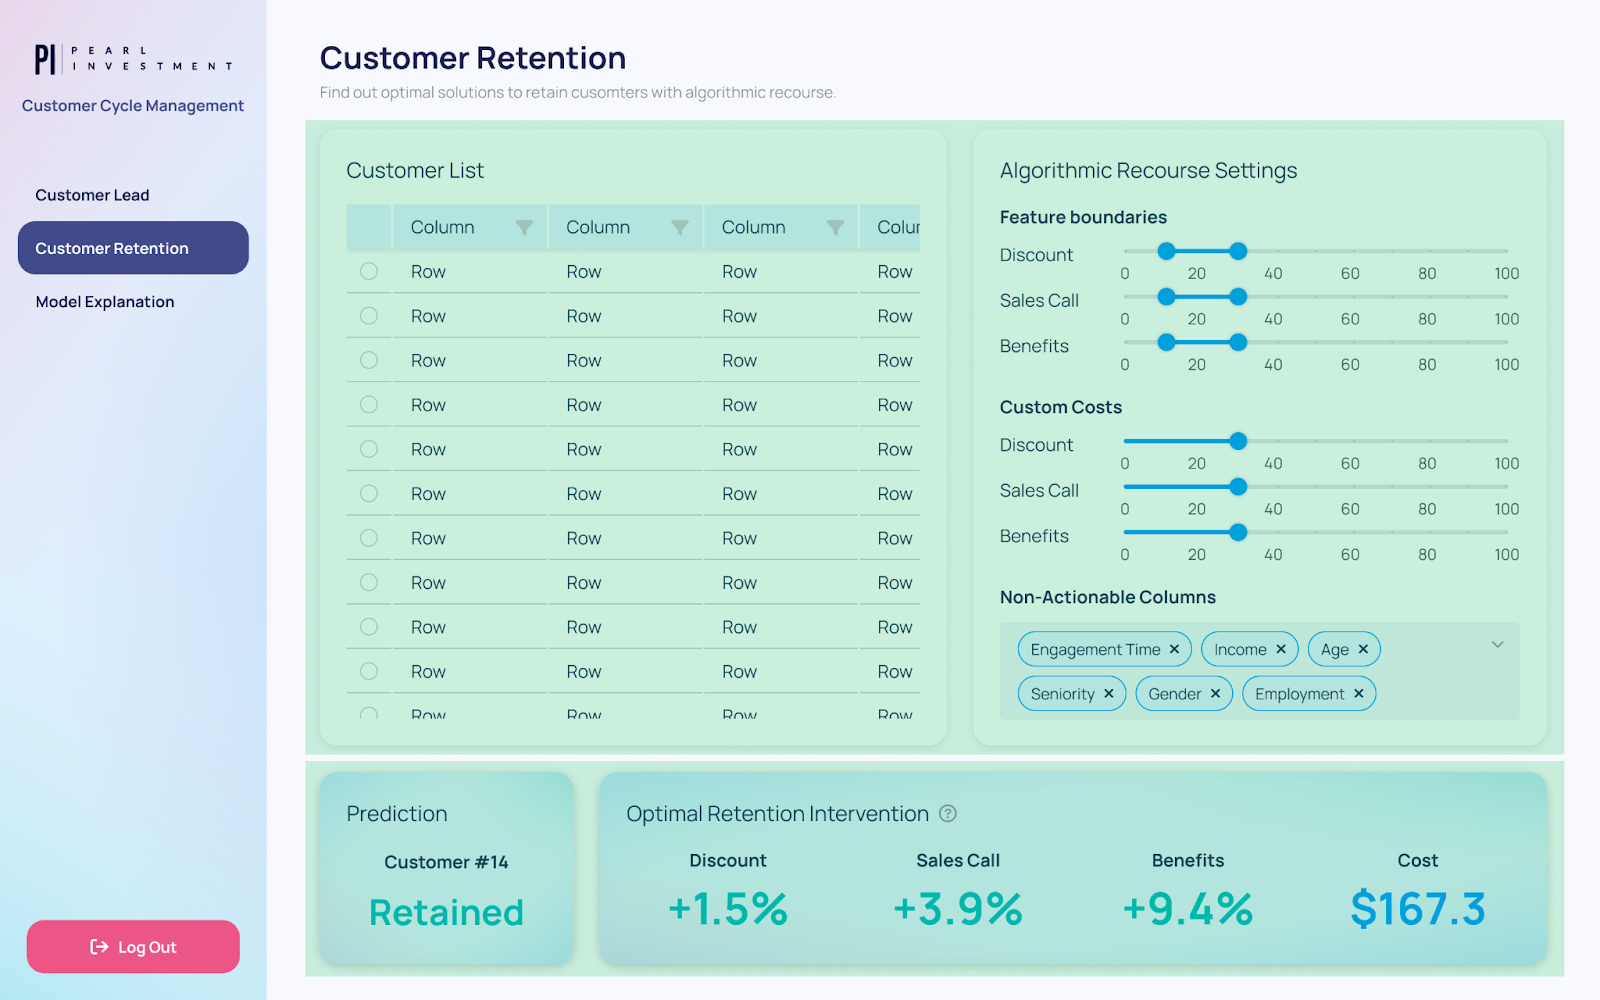
Page split good example

[Good] The page is split into 2 horizontal areas, from input to output.

Secondly, proximity is a very strong visual channel to indicate relevance. If elements are close to each other, it means they are more relevant and vice versa. For example, inputs with different functionalities are better presented in clusters by having more space between them. Clustering signposts to the user that they are now entering a different area, thus reducing the mental burden to identify the purpose of the given interface.
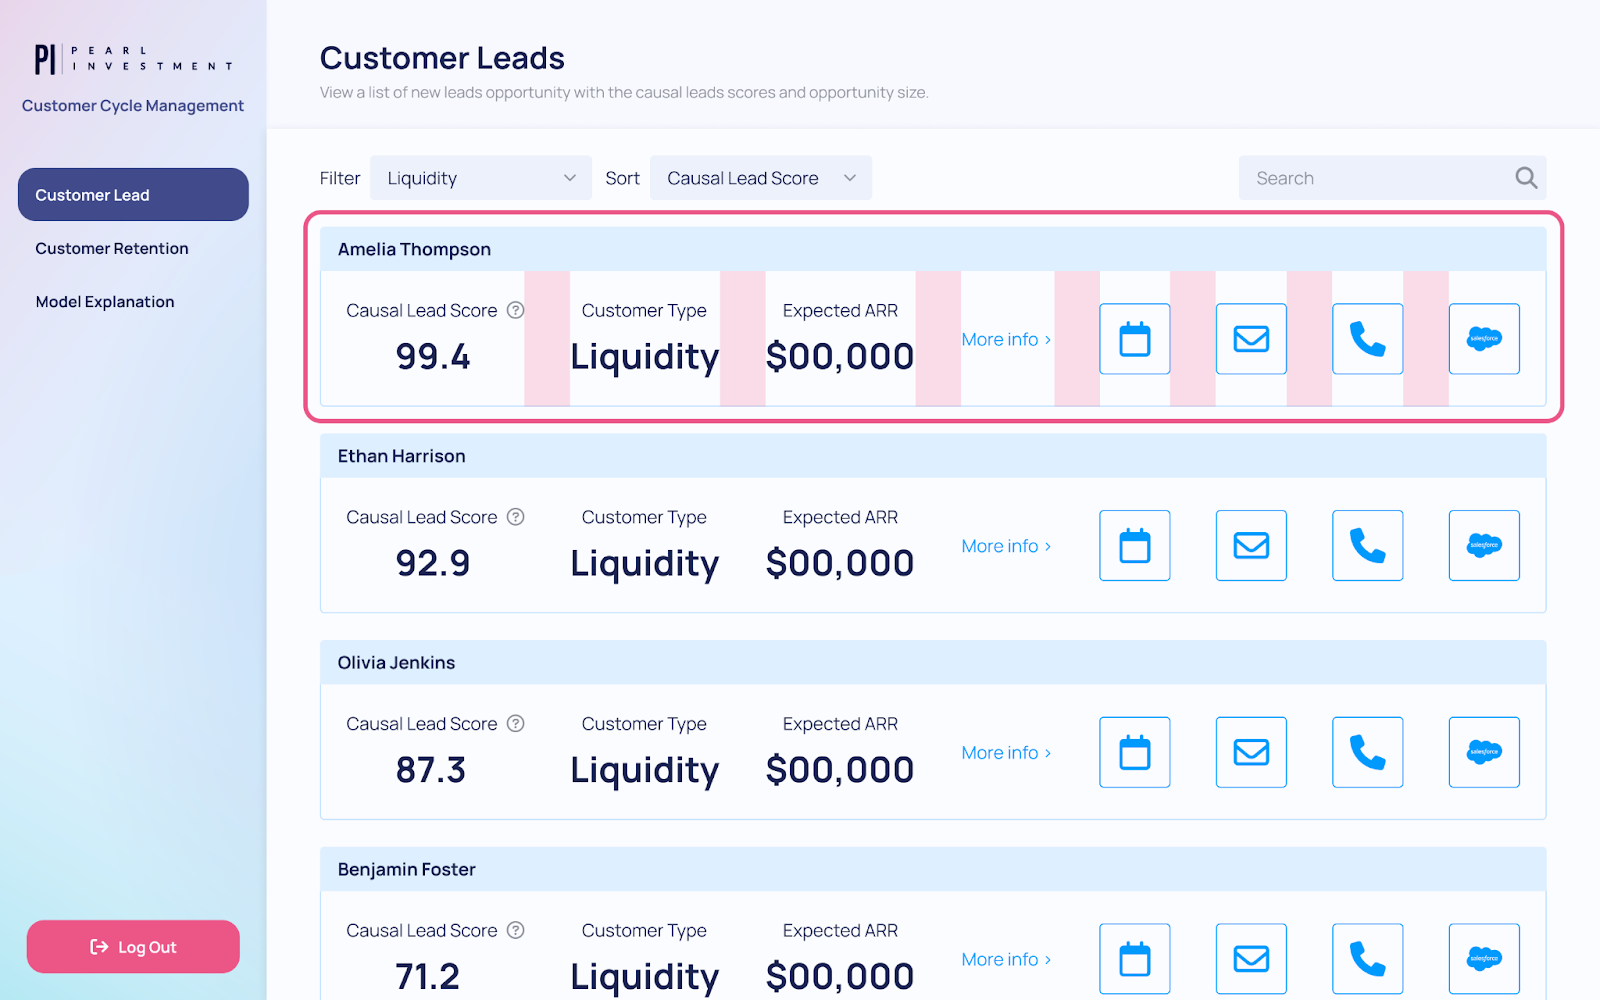
Gaps bad example

[Not good] All the items have gaps of the same size.
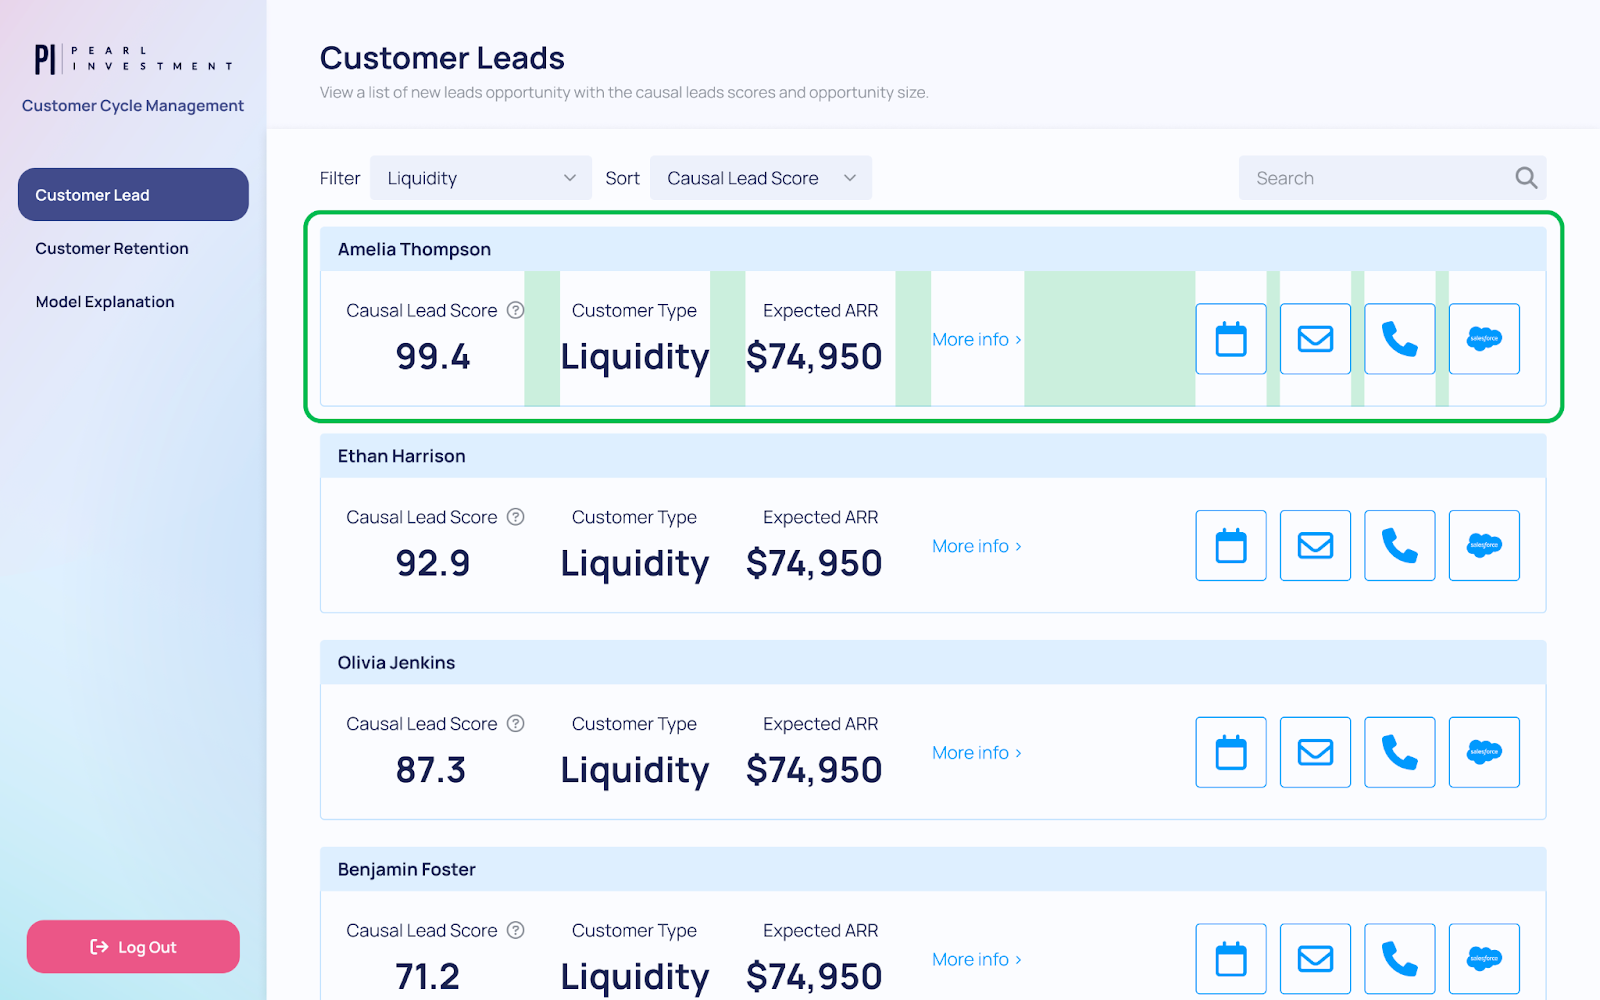
Gaps good example

[Good] Items are grouped into two relevant clusters with a larger gap in between.

Lastly, it is beneficial to utilise various styles, such as colour, size and shape, to draw the user’s attention to significant information. Colour can create focal points easily while implying functionalities with universal connotations. For example, while dark or almost black colours imply plainness, certain colours emit a specific impression like below:

ColourImpressionFunction
BlueNeutral but importantInformation
GreenPositiveSuccess
YellowSomewhat negativeWarning
RedNegativeDanger, Error, Failure

In Dara we provide in the theme default colours that can be used for each of these cases, these also include considerations for colour blindness.

In addition, different styles and sizes, especially for texts such as bold, italic and underline, can signify importance apart from other components.

The caveat is, however, that different styles should not be overused in terms of both the number and frequency. When there are more than five colours present, the colour loses its significance and no longer works as an emphasis. Even with a limited set of colours, if it covers more than half of the interface, it does not provide enough strength to the focal point. Likewise, having too many different styles deters consistency and distracts the user from focusing on the crucial information.
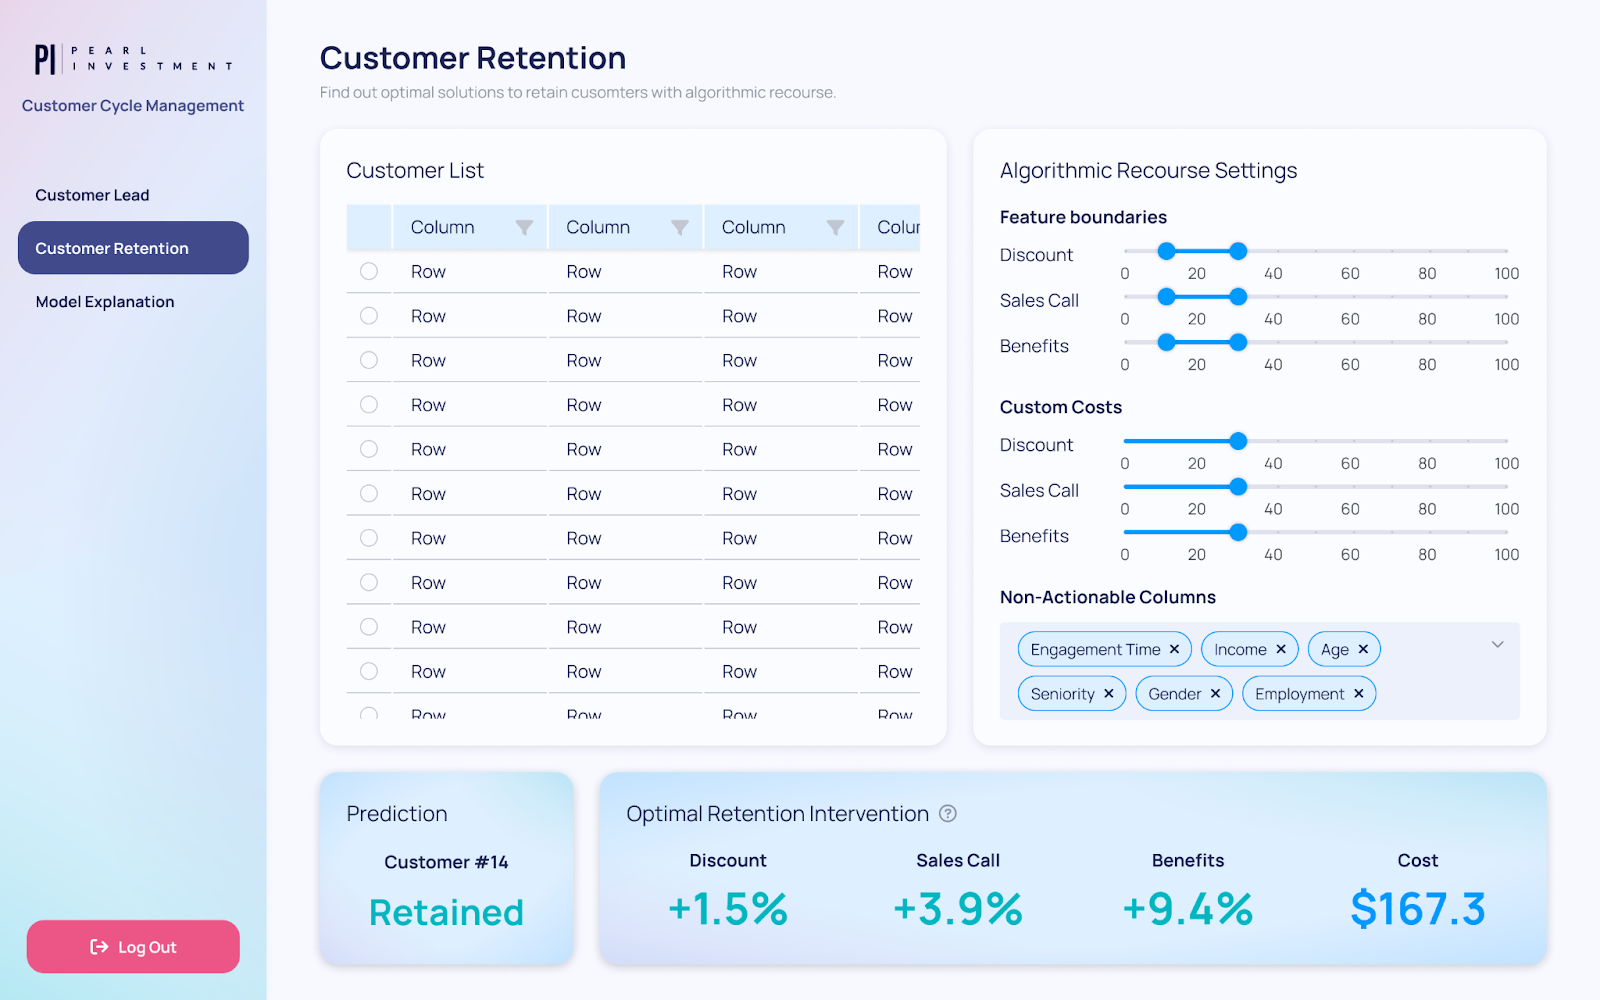
Theme in practice Example

[With good design it is possible to achieve effective colour highlighting even with a limited palette]

Do I have too much?

A common mistake is to try and pack too much in a page, too many inputs, too many graphs. This can be overwhelming and confusing. Although you might be adding more information, in practice the user is less able to digest and understand what is important.

Some common signs that this may be an issue are:

  • Having to adjust the font size to be smaller than default.
  • Having to often remove paddings and margins in order to fit components.
  • Using tooltips rather than text everywhere to explain functionality.
  • Avoiding adding text explaining the context because that will mean other components don't fit.

If there is too much on a page, there is no focus, and users may feel frustrated and simply not able to achieve all the cool things you planned. Make sure the purpose of the page is clear, and to offload where necessary by adding different pages, modals, forms etc.

Do I have too little?

Another common issue is apps that don't have enough context. A random person should be able to look at any page of an app and have a general idea of what it is trying to show and what they can do in it. Of course a data scientist might have a much more in depth understanding of what a certain table is showing than a business user. However both should still be able to understand what that page's purpose is.

  • Do you explain what plots and tables are attempting to show?
  • Do you clearly explain what inputs are required from the user?
  • Is there any more context that is needed in an area for a user to understand how to use it?

Make sure your design has space to add both text and tooltips as appropriate, so that your app is self-sufficient. A user ideally should not need a tutorial to understand how to use an app!

Choosing the right components

Although multiple components could be used to achieve the same purpose, each component comes with its own set of conventions so understanding these can help you to choose the right component for the job and reduce friction with the user.

For example, suppose you have a list of items and you want the user to choose between them. There are a number of components that could be used here, to name a few you could use radio buttons (RadioGroup), checkboxes (CheckboxGroup) or a select dropdown (Select).

RadioGroup Example CheckboxGroup Example

If you can only have one item selected at a time that would require either radio buttons (RadioGroup) or a simple select dropdown (Select). However if multiple items could be chosen, that would be checkboxes (CheckboxGroup) or a multi-select dropdown (Select with multi=True flag).
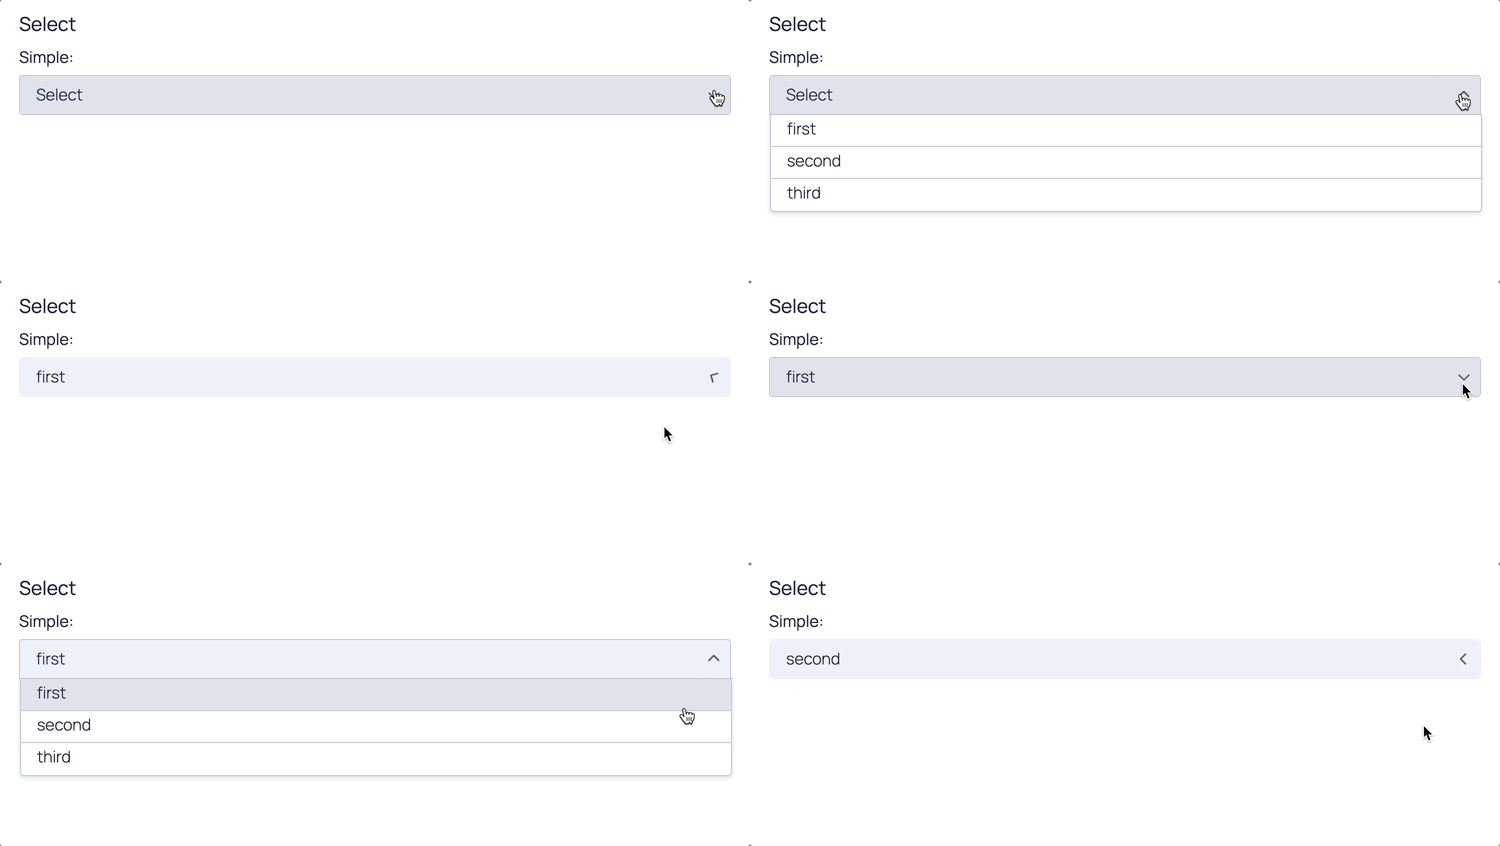
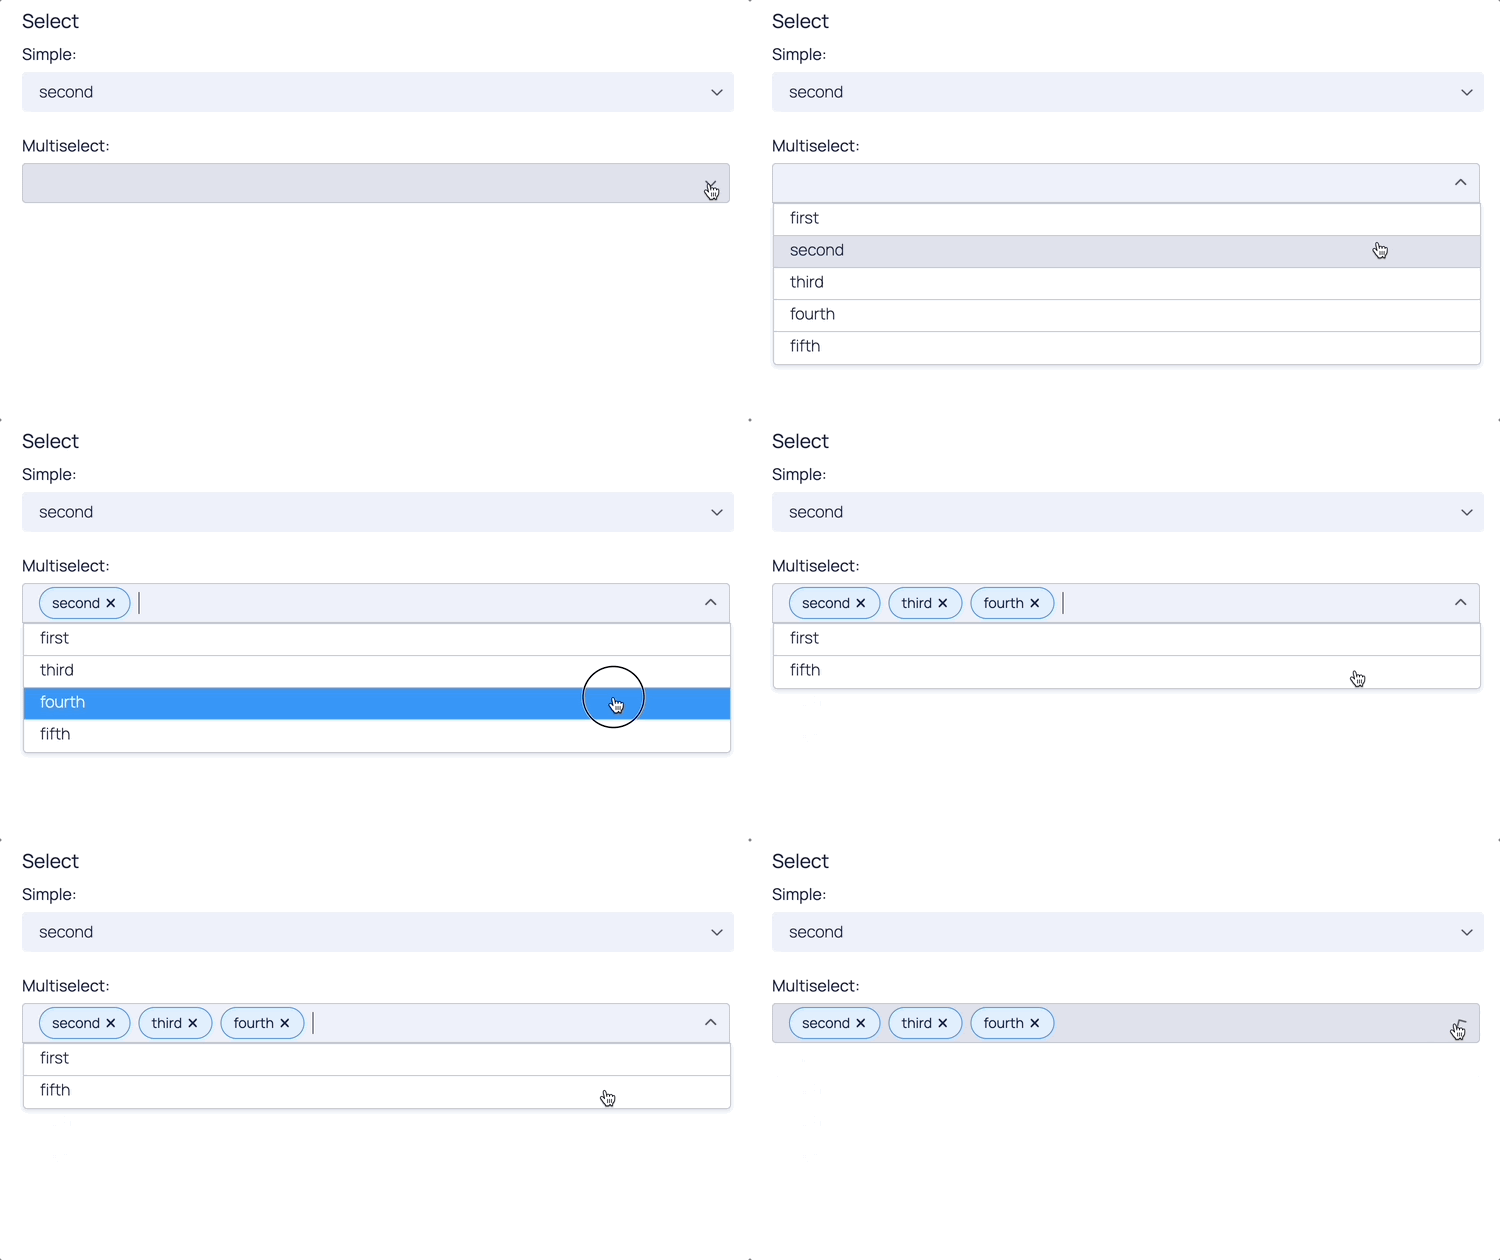
Select Example Multi Select Example

When choosing the right component, context is always key. RadioGroup and CheckboxGroup show all of the available selections, these are often more appropriate for forms because you need to see the options at once to make your decision. However Select is more compact, and if the user doesn't need all the options immediately visible, using the Select component could be the way to go.

And if the choice involves images or graphs then maybe what you need is ComponentSelectList!

ComponentSelectList Example

Conclusion

This blog post covered major design principles including consistency, visual hierarchy, appropriate amount of information and following the convention. In spite of simplicity, they are highly effective in boosting both the user experience and user interface, and make your life as an app creator much easier.

What is important to bear in mind is that design is a language with its own rules, and depending on how you string the words together, it can be easy or hard to understand. With these tips, we hope to have provided you with some of the 'grammar' to improve the way you communicate through apps.

· 10 min read
Patricia Jacob
Seojin Park

Introduction

The purpose of this blog post is to guide you through the typical stages of app design, whether you're an engineer or a data scientist. In this guide you will walk through a step-by-step building process of creating a user-friendly app. In the world of technology, effectively presenting your work to stakeholders is a fundamental practice. A basic understanding of design allows bridging the gap between technical expertise and stakeholder communication, and giving your work a distinctive edge that resonates with both functionality and appeal.

For data scientists

As a data scientist, your skills to collect, process, and analyze data and to train sophisticated models provide valuable insights that guide key stakeholders towards making the right decisions. However, you might often face challenges in effectively communicating these results. Relying on static documents may fail to showcase the full potential of your models and to captivate the interest of business users. Nothing can be more frustrating than your work not being utilized to its maximum potential. This is where a dynamic, interactive application comes into play. It transforms your work into a living tool, inviting stakeholders to an environment of exploration, collaboration, and real-time decision-making.

For engineers

As an engineer, your role is central to translating ideas and requirements into functional and efficient applications, building interfaces that users interact with, and ensuring that technology serves its intended purpose seamlessly. By having a foundational understanding of design principles, you not only enhance coding skills but also become a part of a process that's about building tools that empower decision-making, exploration, and real-time engagement with data.

Dara is here to help

Dara is an application framework that enables you to build visually appealing and interactive web applications. It provides prebuilt components that can be easily put together in Python. With Dara, you can showcase your creation and communicate outcomes effectively overcoming the gap between technical and non technical users.

From an idea to design

This blog will guide you through the process of designing an interactive app which can be adapted and followed in any context to promote user-friendliness.

Suppose you are a data scientist at the company “Pearl Investment”. With the available data, you developed a fantastic model to identify new customer leads and retain current ones. Now, it’s your time to show it off - but how?

Define the application goals

Firstly, it's vital to ask, "Why go through the effort of making an app at all?" It's essential to define the goals before diving into the process. Here are some guiding questions:

  • What problem is your app addressing?
  • How does it add value to your users?
  • What are the key takeaways from your app?

Once you understand your user’s goals, then the purpose of the app becomes clear. At this stage, you don’t have to think about features and designs. Remember, clarity of purpose is key when it comes to creating a useful and successful app!

GoalsApp
The user wants to know whom they should call from a vast listRecommend potential new customers
The user wants to identify who is at risk of leaving and what strategies can retain themSuggest retention strategy for existing customers
The user wants to ensure the model is trustworthyDemonstrate the model's reliability and accuracy

Identify your users

Next steps are to define the user(s) of the app, the cornerstone of user-centred design. An understanding can be built through methods ranging from market research and brainstorming to casual discussions over a cup of tea. For instance, at Pearl Investment, Sales Managers could benefit from the app's predictive model to strategize their daily communication tasks, determining whom to call or email.

User TypeCharacteristics
Sales manager- Not very technical
- Prefer conventional plots and text explanation
- Need prompt actions everyday
- Care about model performance and explainability

Planning the app structure and features

Having outlined what the app is, its purpose, and its intended users, our next step is to visualize the user journey. It is crucial for you to understand how users will navigate through the app and what pages they'll need to fulfil their objectives.

If the app is complex, it is effective to have separate pages in a natural order and present relevant contents together to reduce the cognitive burden of the user. And Dara provides a template where you can easily put contents into several pages. One way to facilitate this process is to visualize a typical user's journey through the app:

  • Opening the app, the first thing I view is the candidates.
  • I click on a specific candidate to get a detailed analysis.
  • I identify customers likely to churn on a separate page.
  • I set the restriction based on reality and get a retention strategy.
  • I explore a detailed analysis of the suggestion.
  • I want to check how trustworthy the model is with visual and text explanations.

Now the idea on what features are needed and where it should be placed becomes more tangible. This can turn into a brief “spec” of an app like the table below. Remember, it's entirely natural to make adjustments to this structure as you add and refine features. Just make sure the pages follow a logical hierarchy and the user journey stated above.

PageFeatures
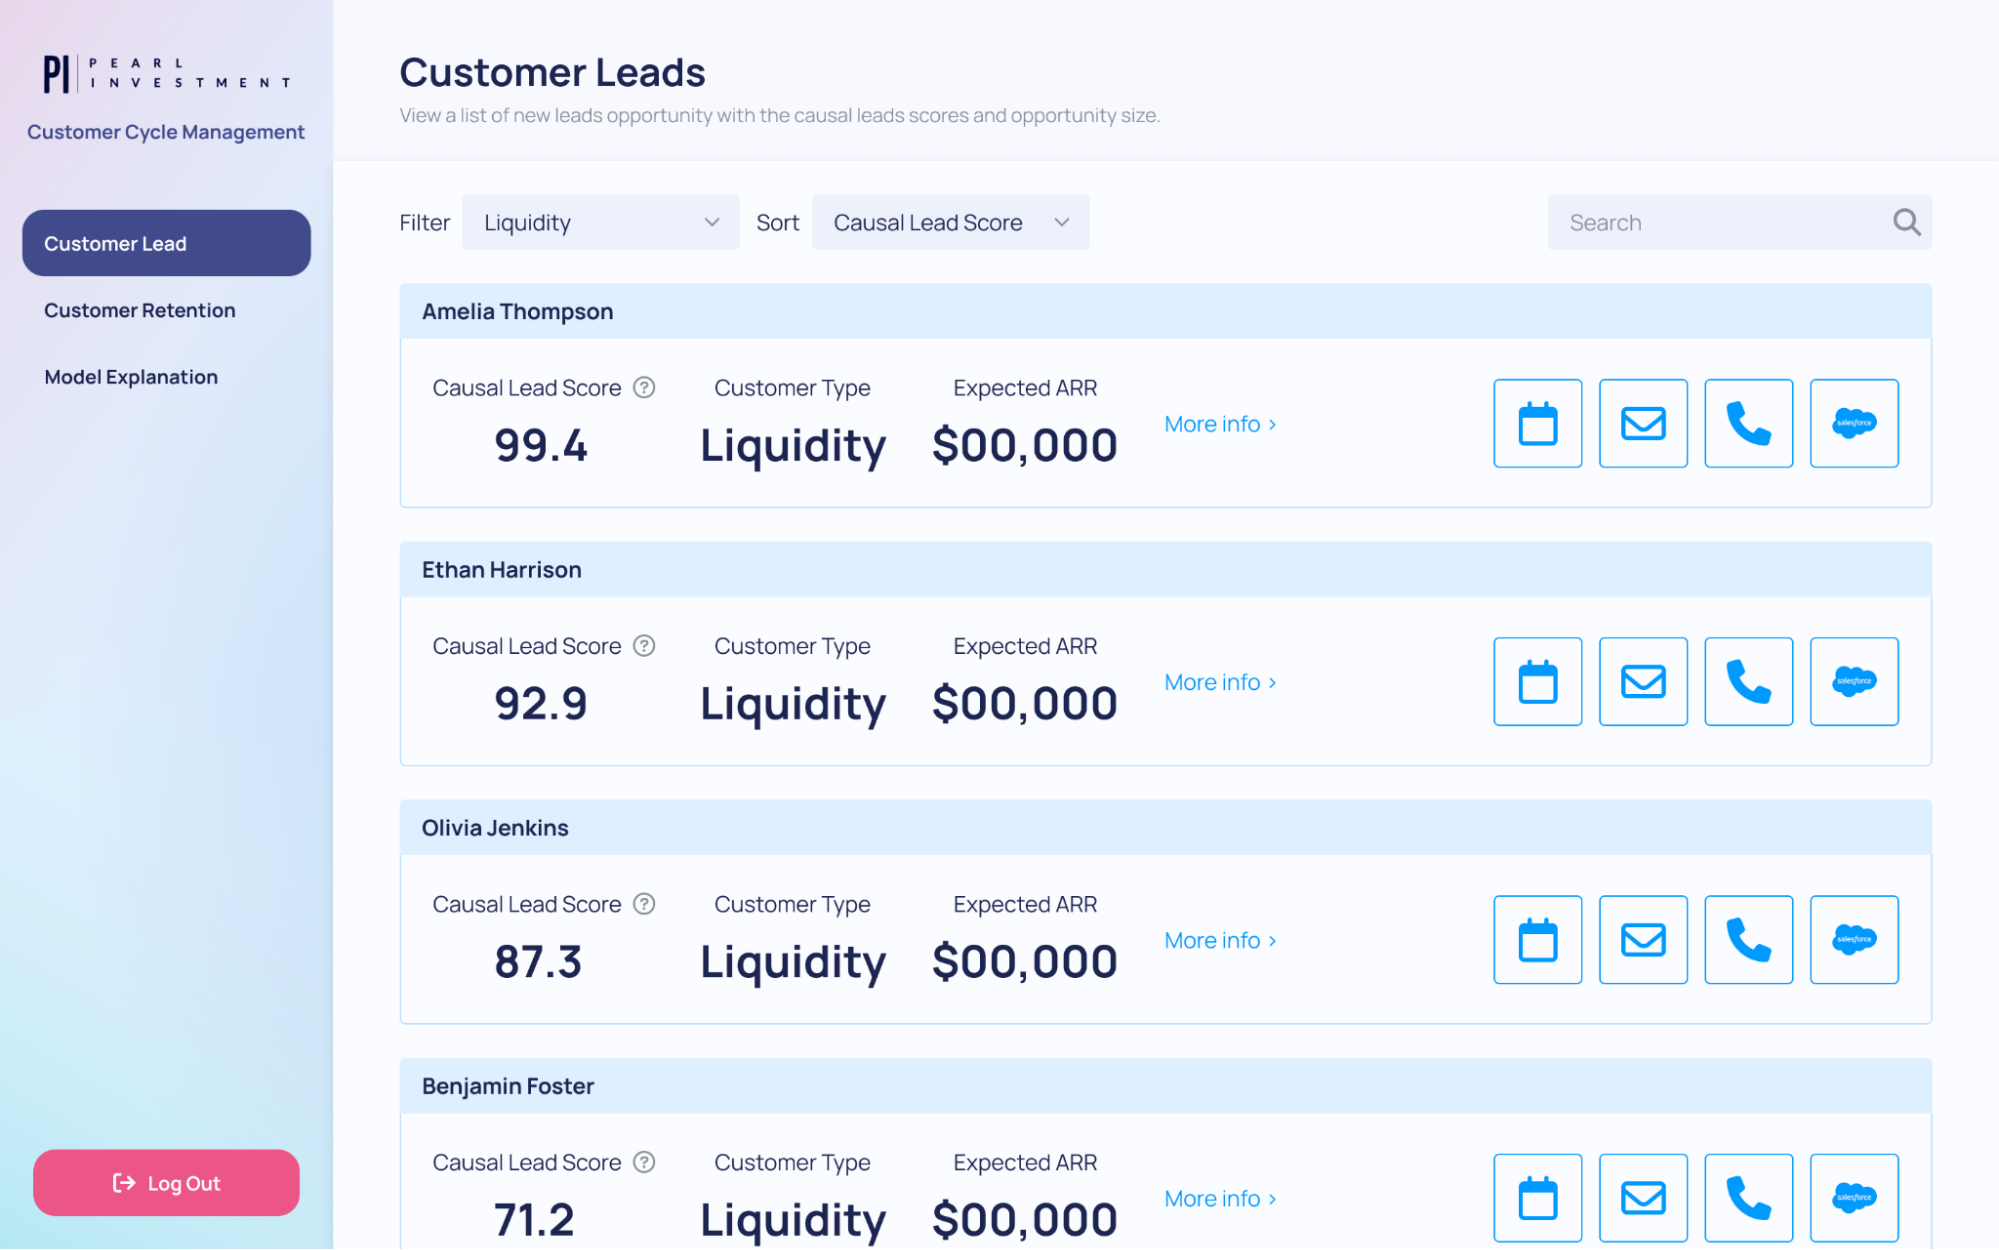
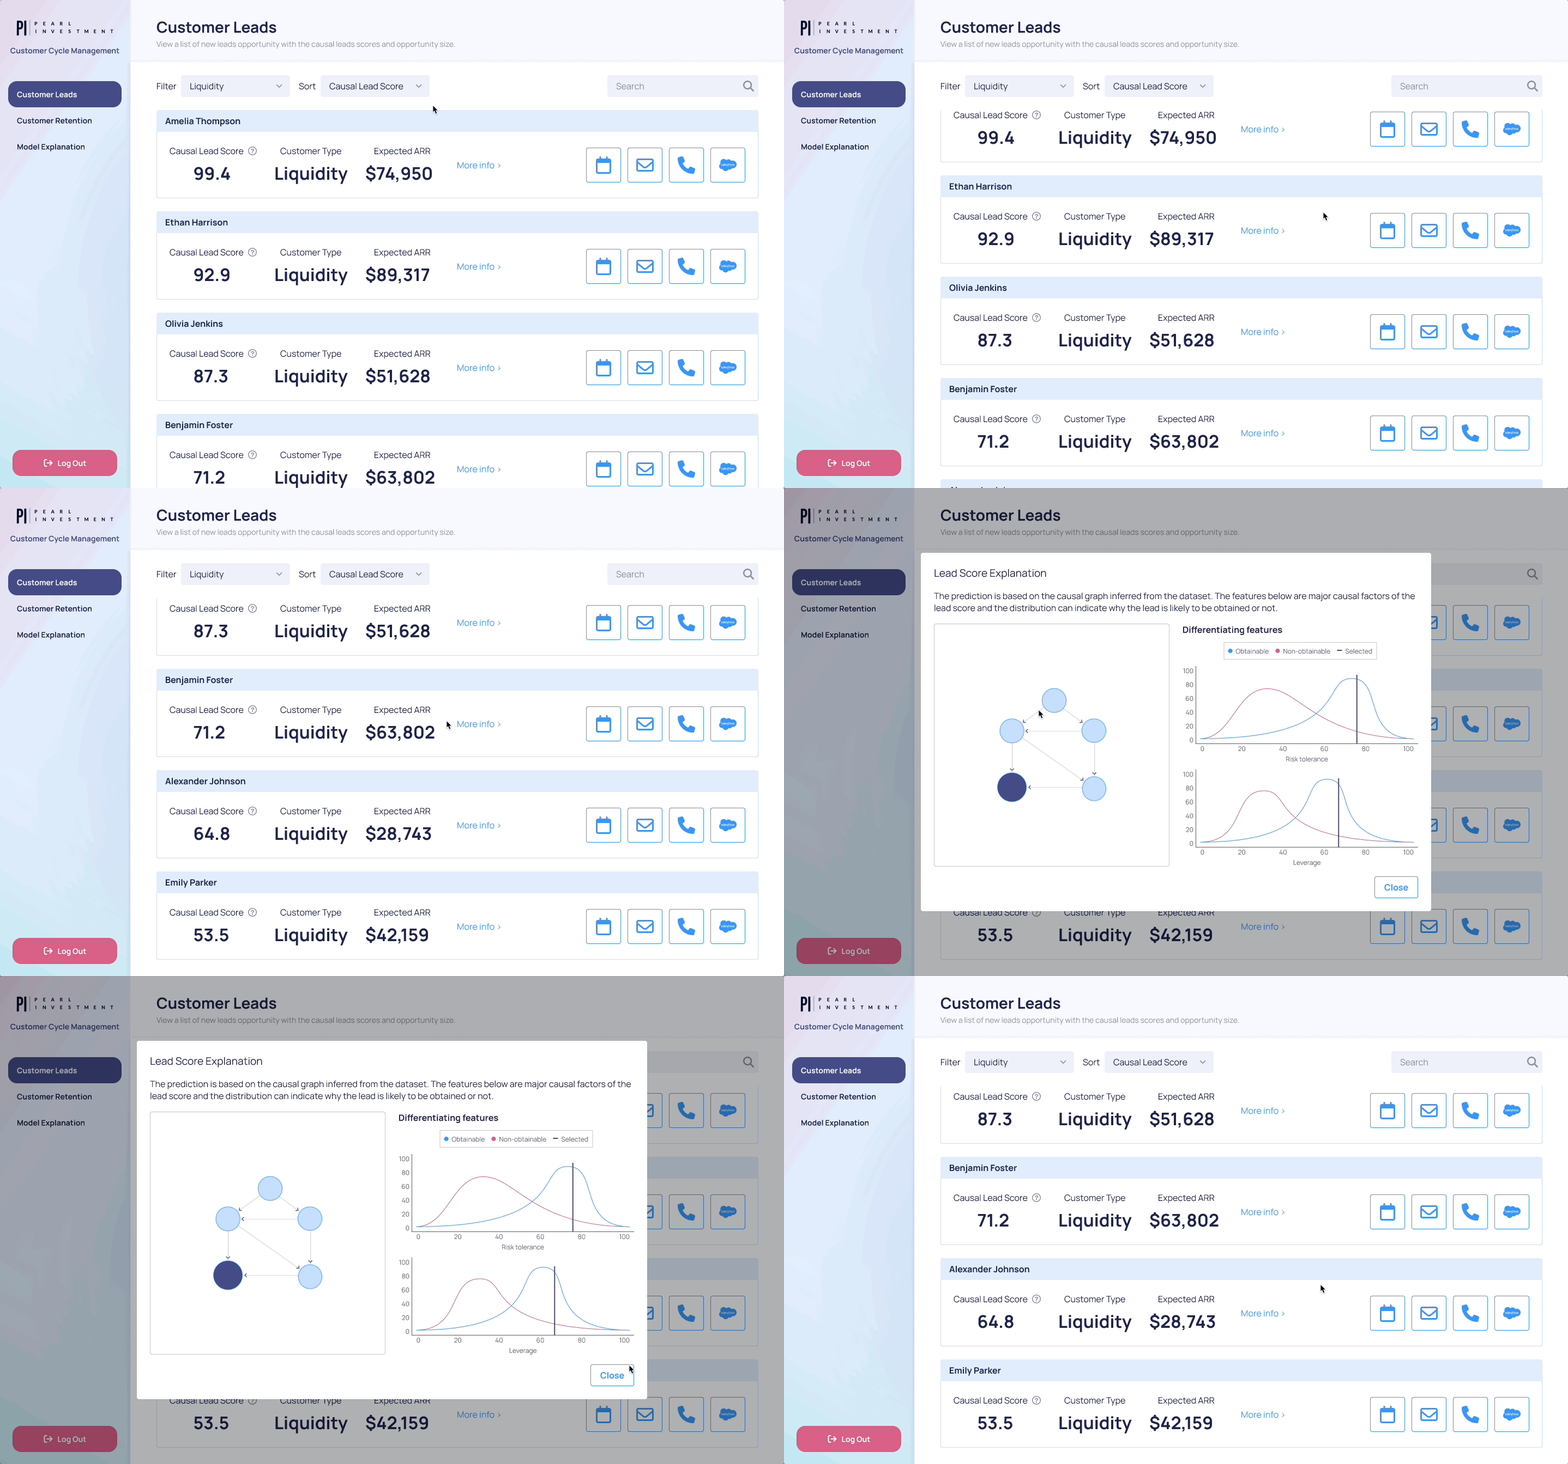
Customer Leads- A list of customer leads with scores.
- Filter and sort to identify specific customers.
- Various action buttons such as call, email, and integration with salesforce.
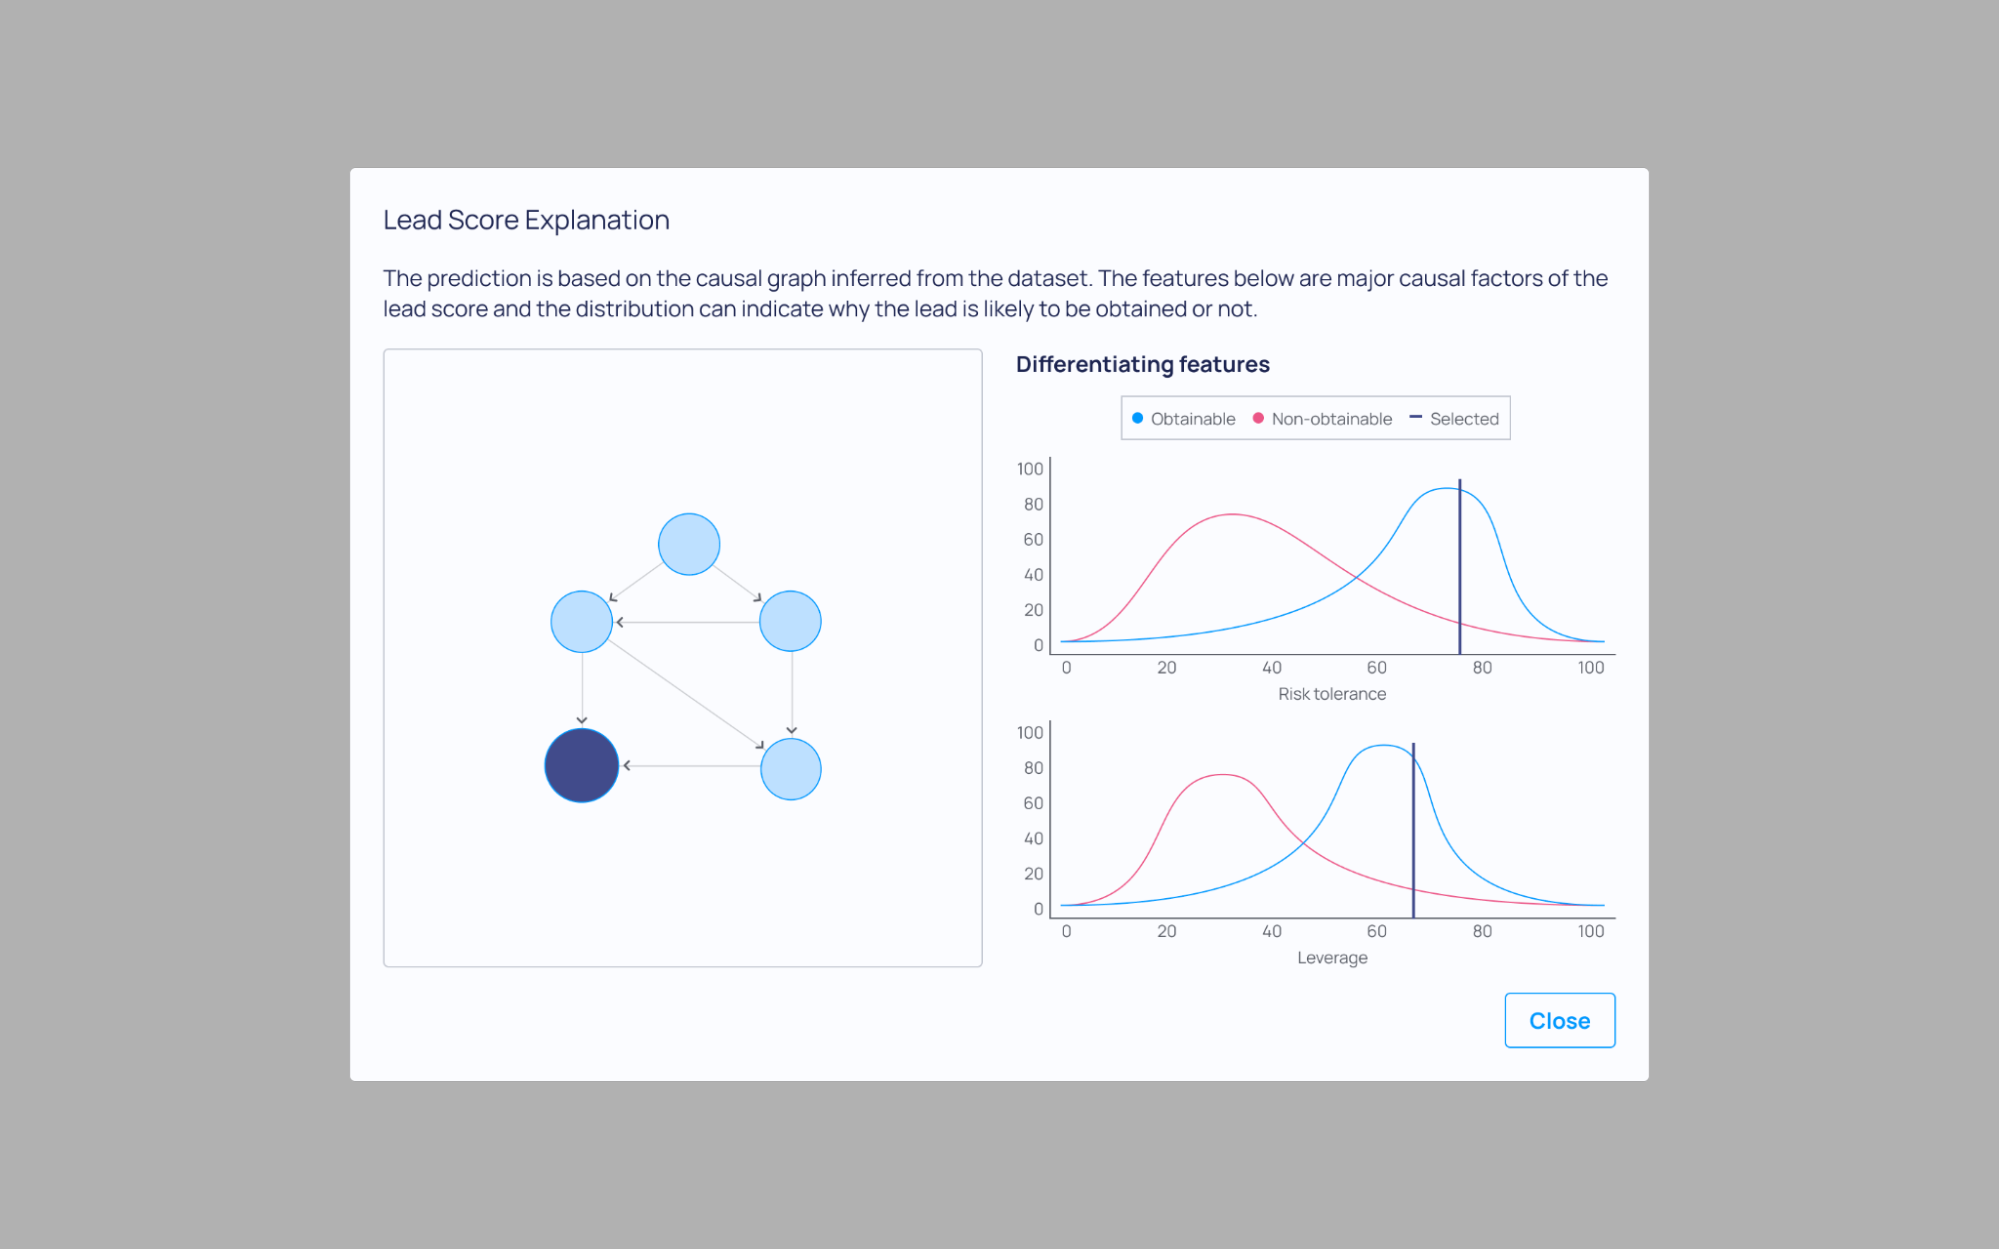
- Modal to explain why this customer has this score with data distribution.
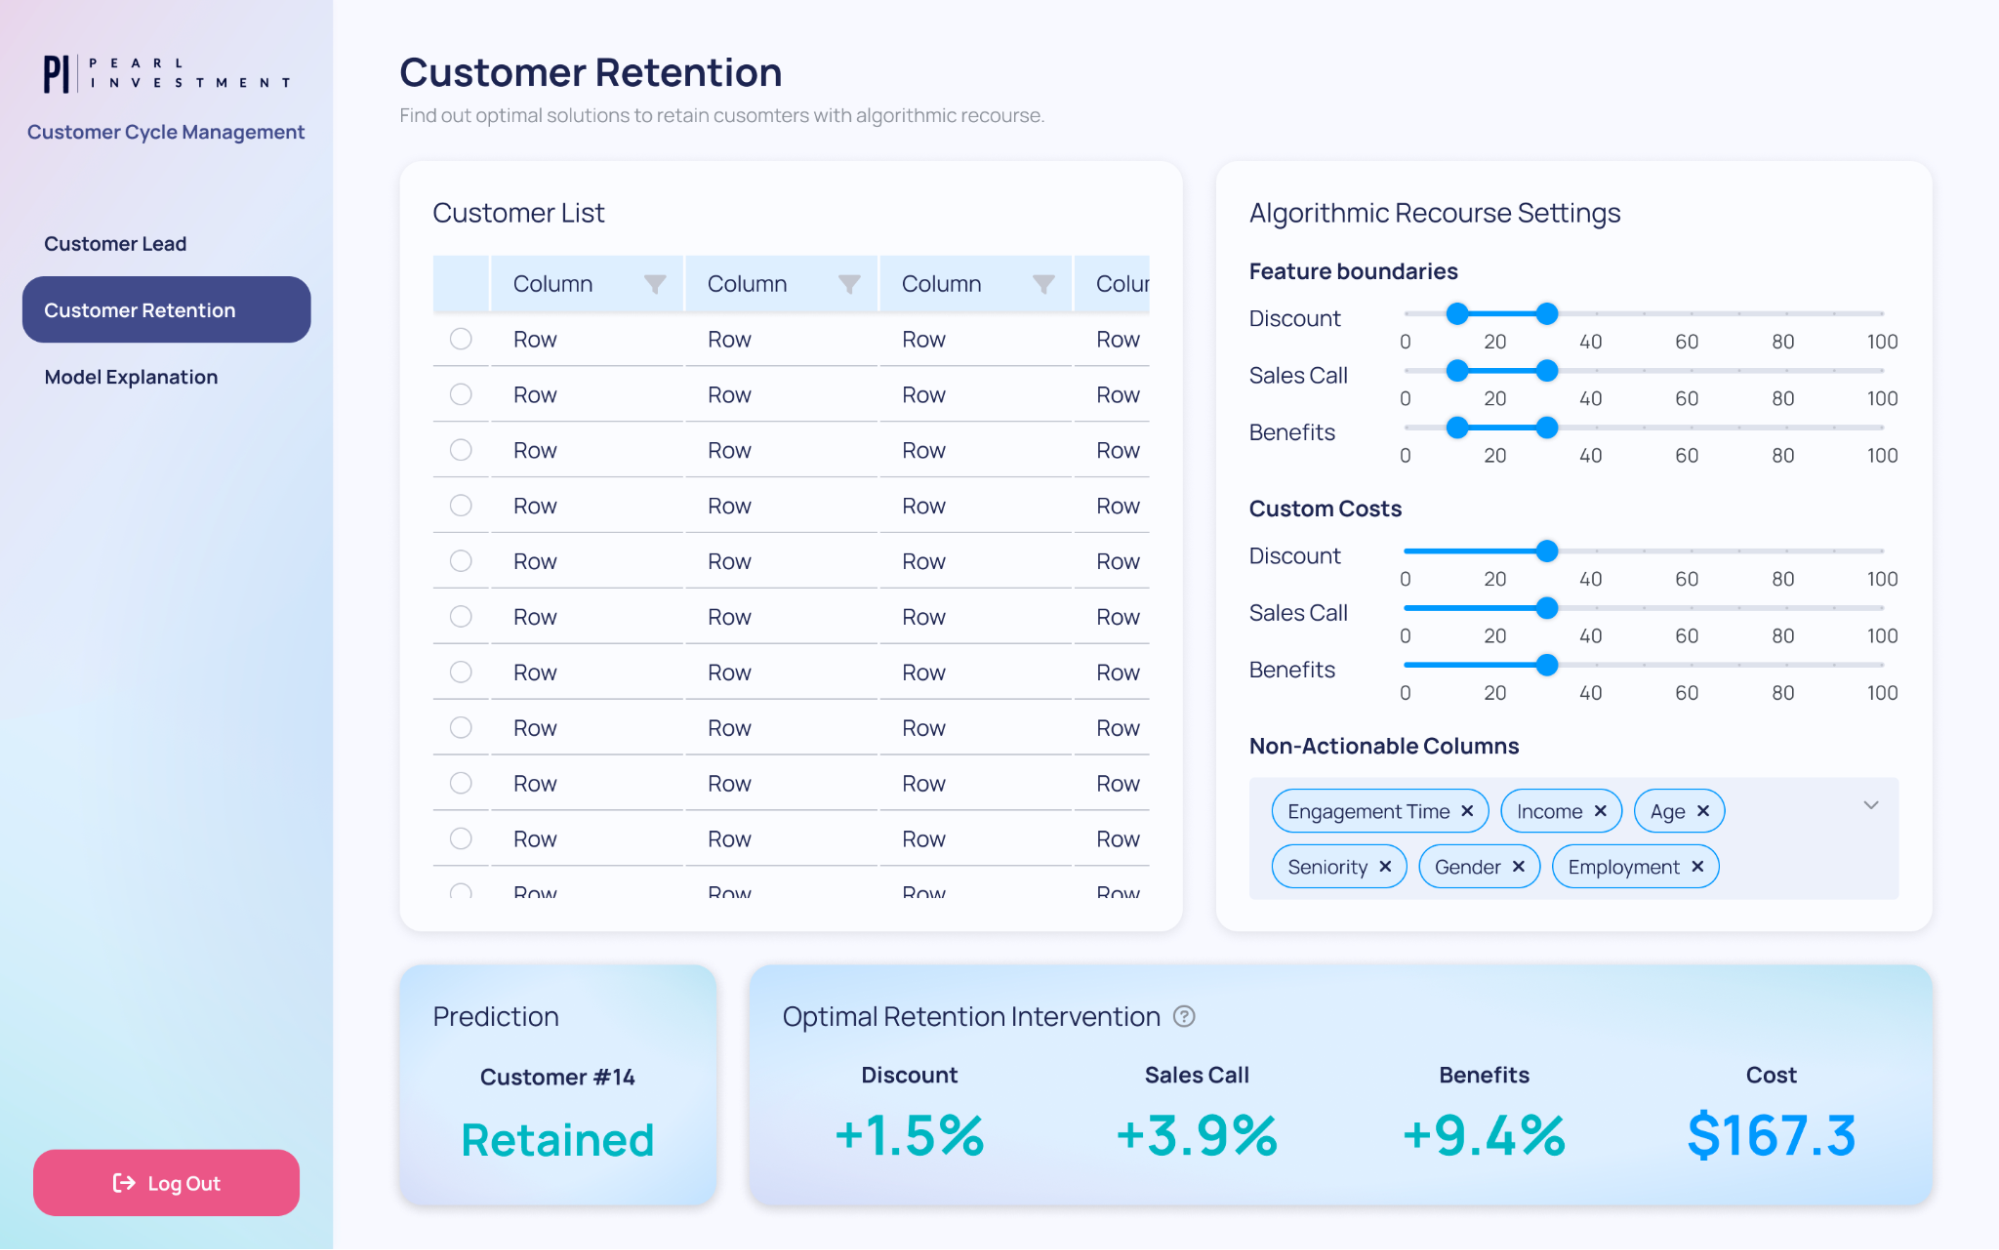
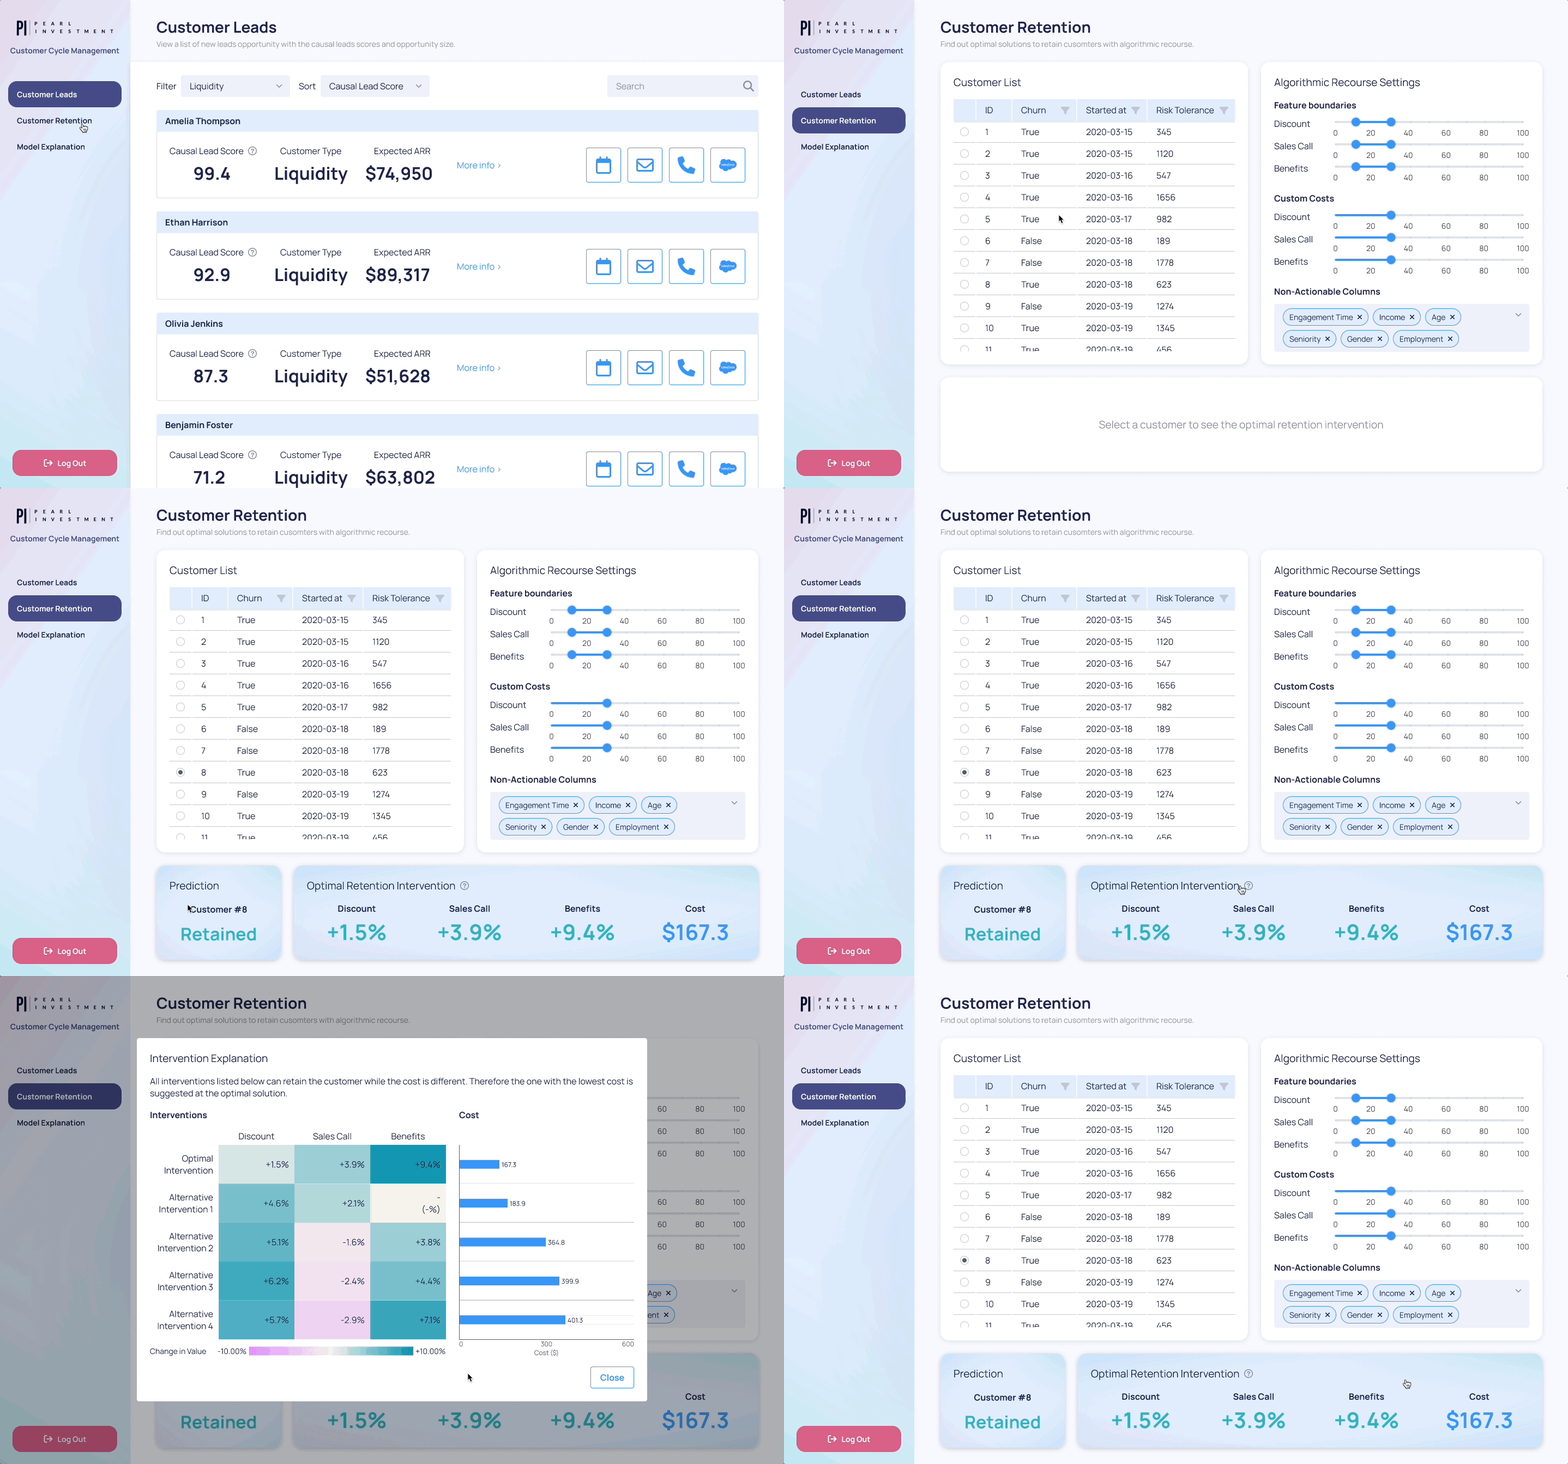
Customer Retention- A list of customers with churn probability.
- A panel to adjust constraints for intervention.
- A result panel to show possible intervention.
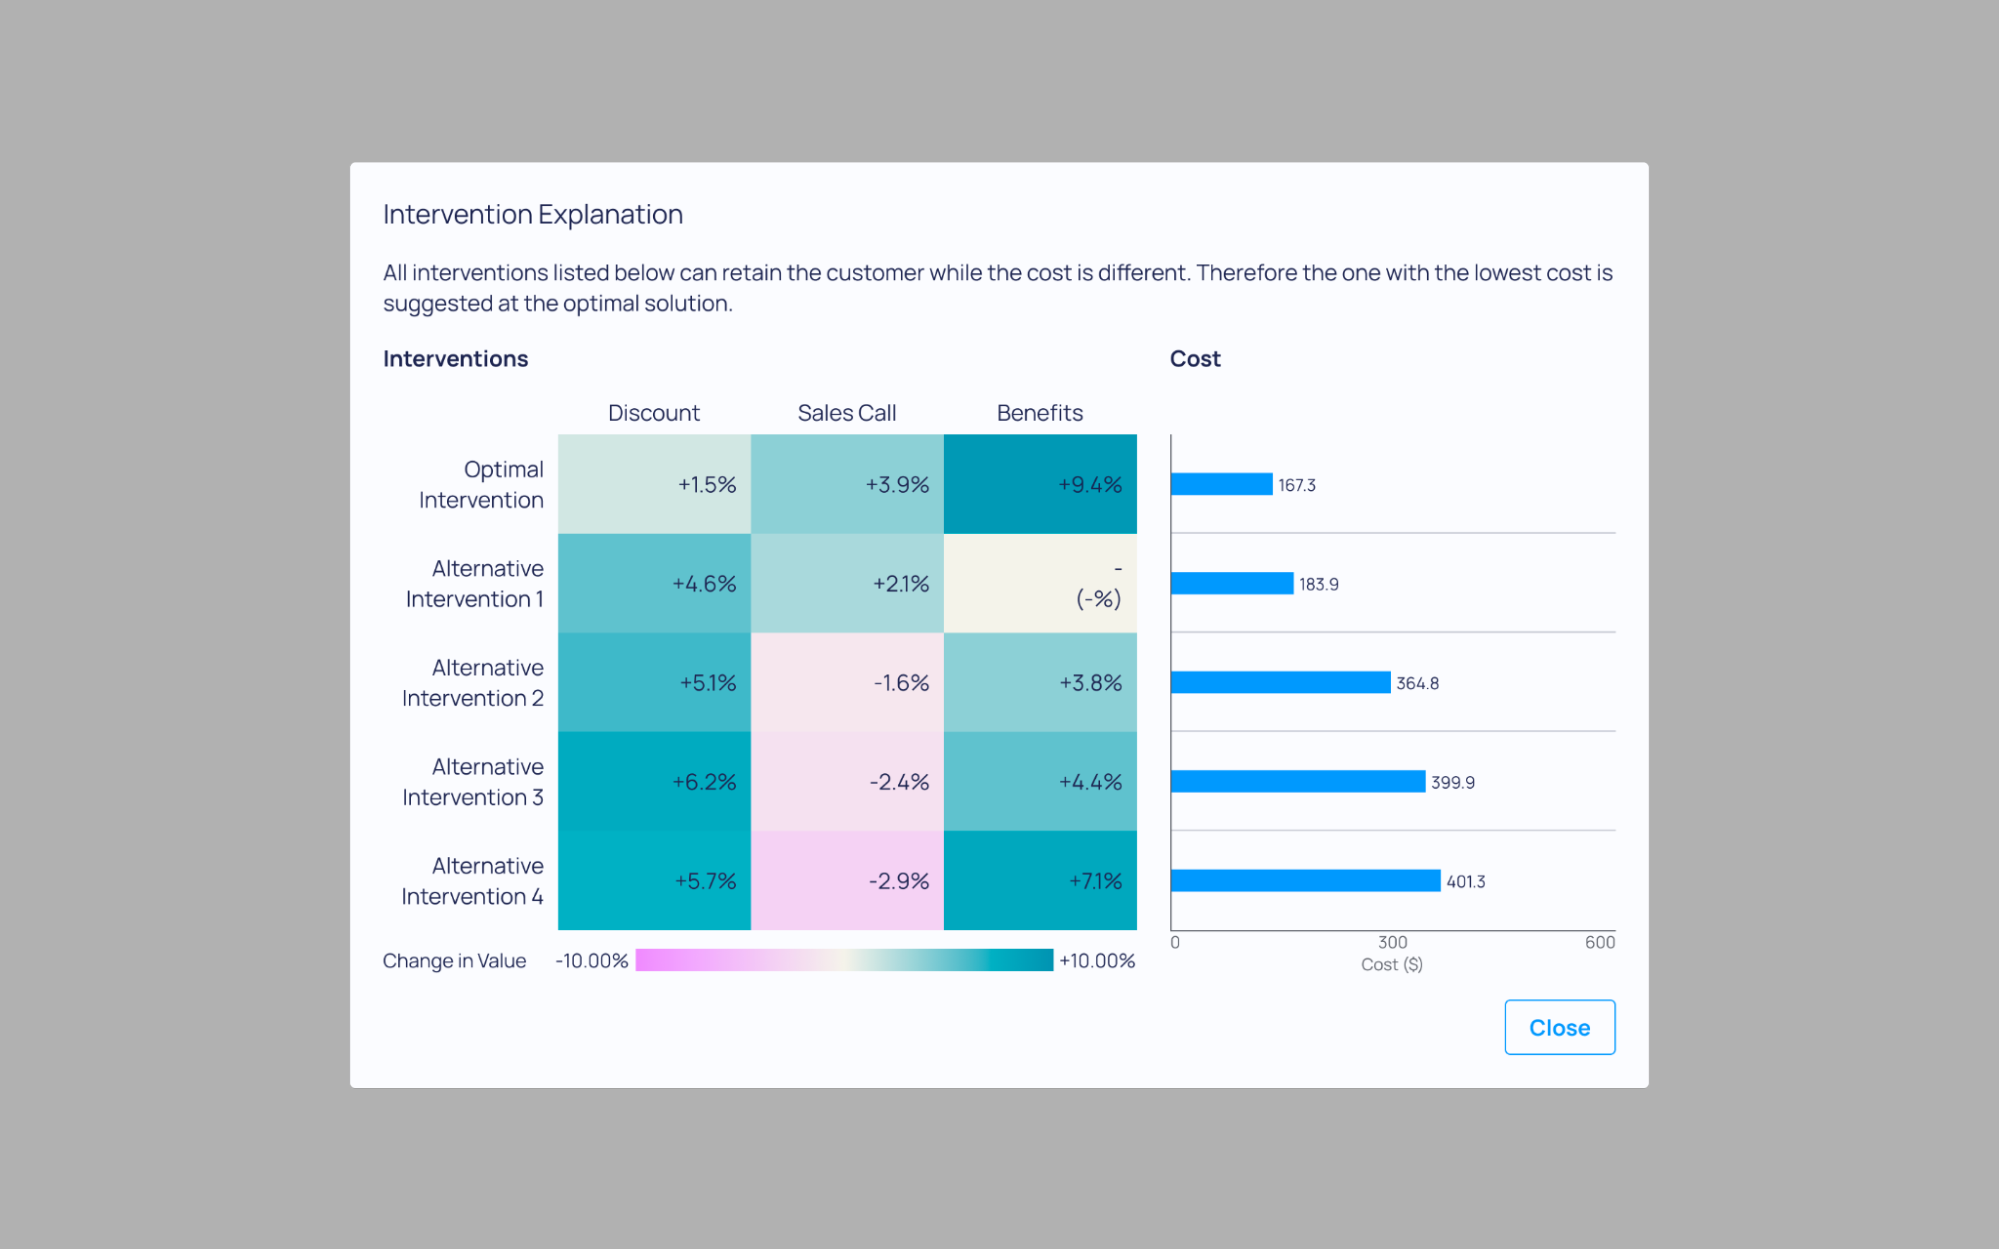
- Modal to explain why this intervention was suggested with plots.
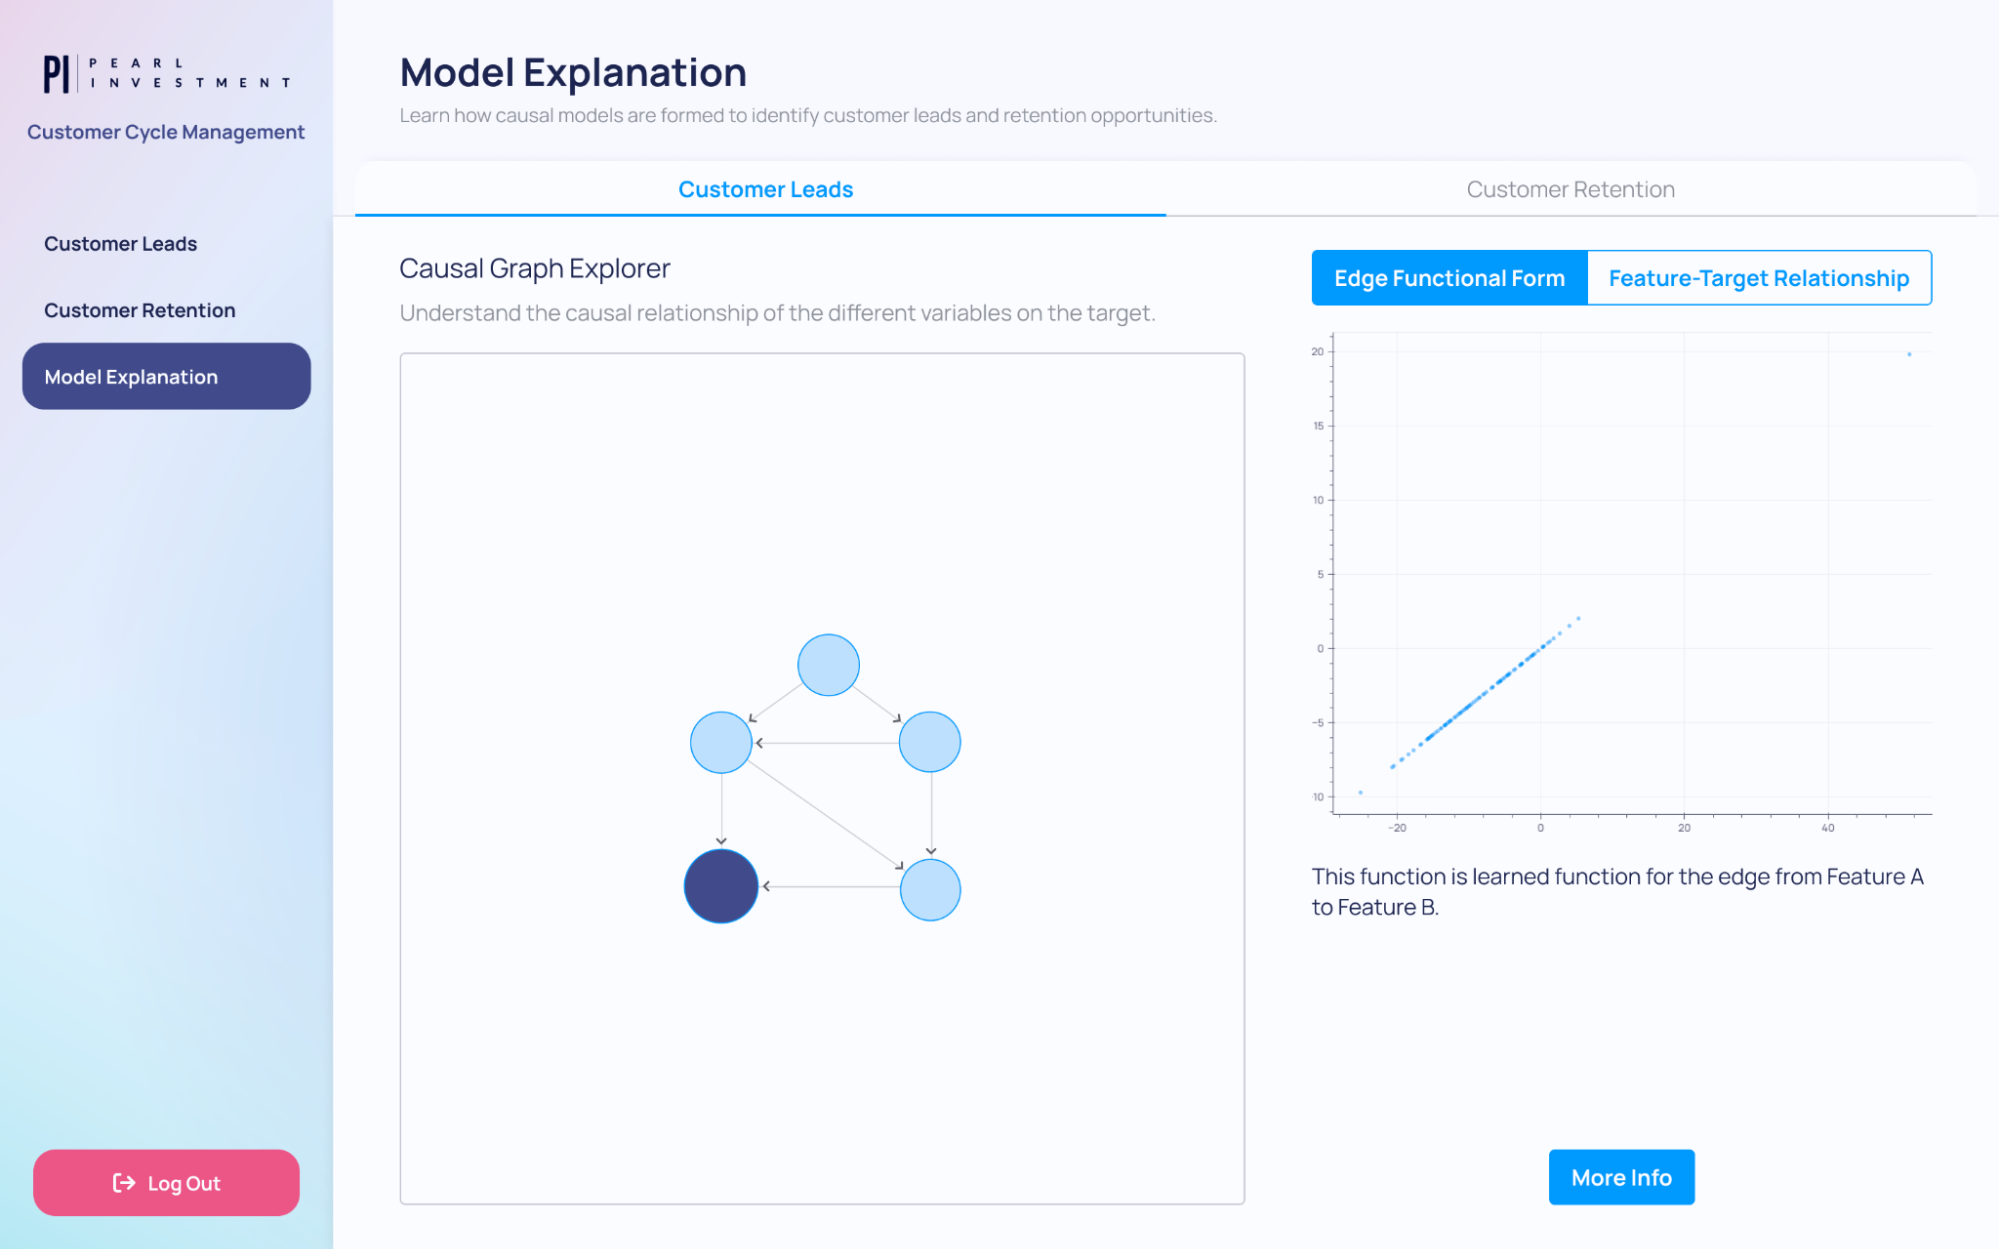
Model Explanation- Show a causal graph and explain nodes and edges for the Customer Leads model.
- Show a causal graph and explain nodes and edges for the Customer Retention model.

Each feature requires relevant inputs and outputs, therefore, it is important to examine available resources and additional resources required to turn this vision into reality. This involves asking questions like "What information needs to be displayed to the user?” and “What inputs are needed from the user to bridge the gap between our available resources and the information they need to see?” For example, if you were to develop a generic customer cycle management app for any investment firm, you might need to include a feature allowing users to upload their own datasets into the app.

Drawing a wireframe

Now you have all the ingredients to visualise and put into a design or a “wireframe”. Wireframes serve as the blueprints of an app, providing a visual representation of its layout and functionality. The temptation to dive headfirst into coding might be high, but allocating time for sketching or planning can be incredibly beneficial. The advantages of wireframing are manifold: it facilitates swift iteration between various designs, aids in aligning team ideas and vision for an app before extensive coding efforts, and once completed, it can be broken down into manageable components to enhance app structure and maintainability.

Creating wireframes doesn't have to be a complex process; they can be as simple as rough hand-drawn sketches, effectively and swiftly bringing your ideas to life. For those preferring digital tools or seeking a straightforward interface, Excalidraw serves as an intuitive choice. For more experienced users seeking advanced features, tools like Figma are worth considering. The choice between these methods hinges on your comfort level, expertise, and the project's unique requirements.

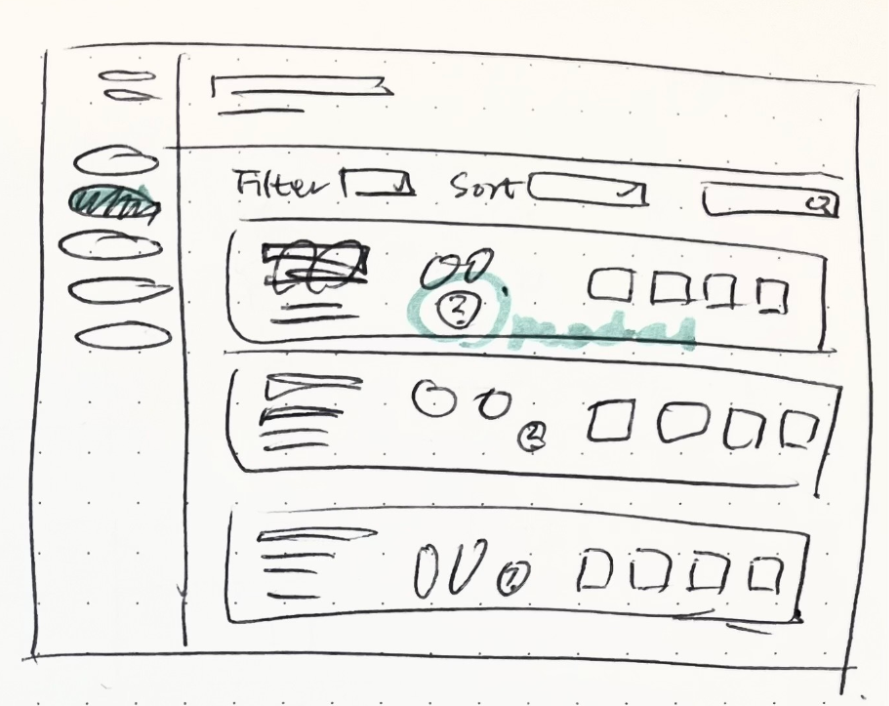
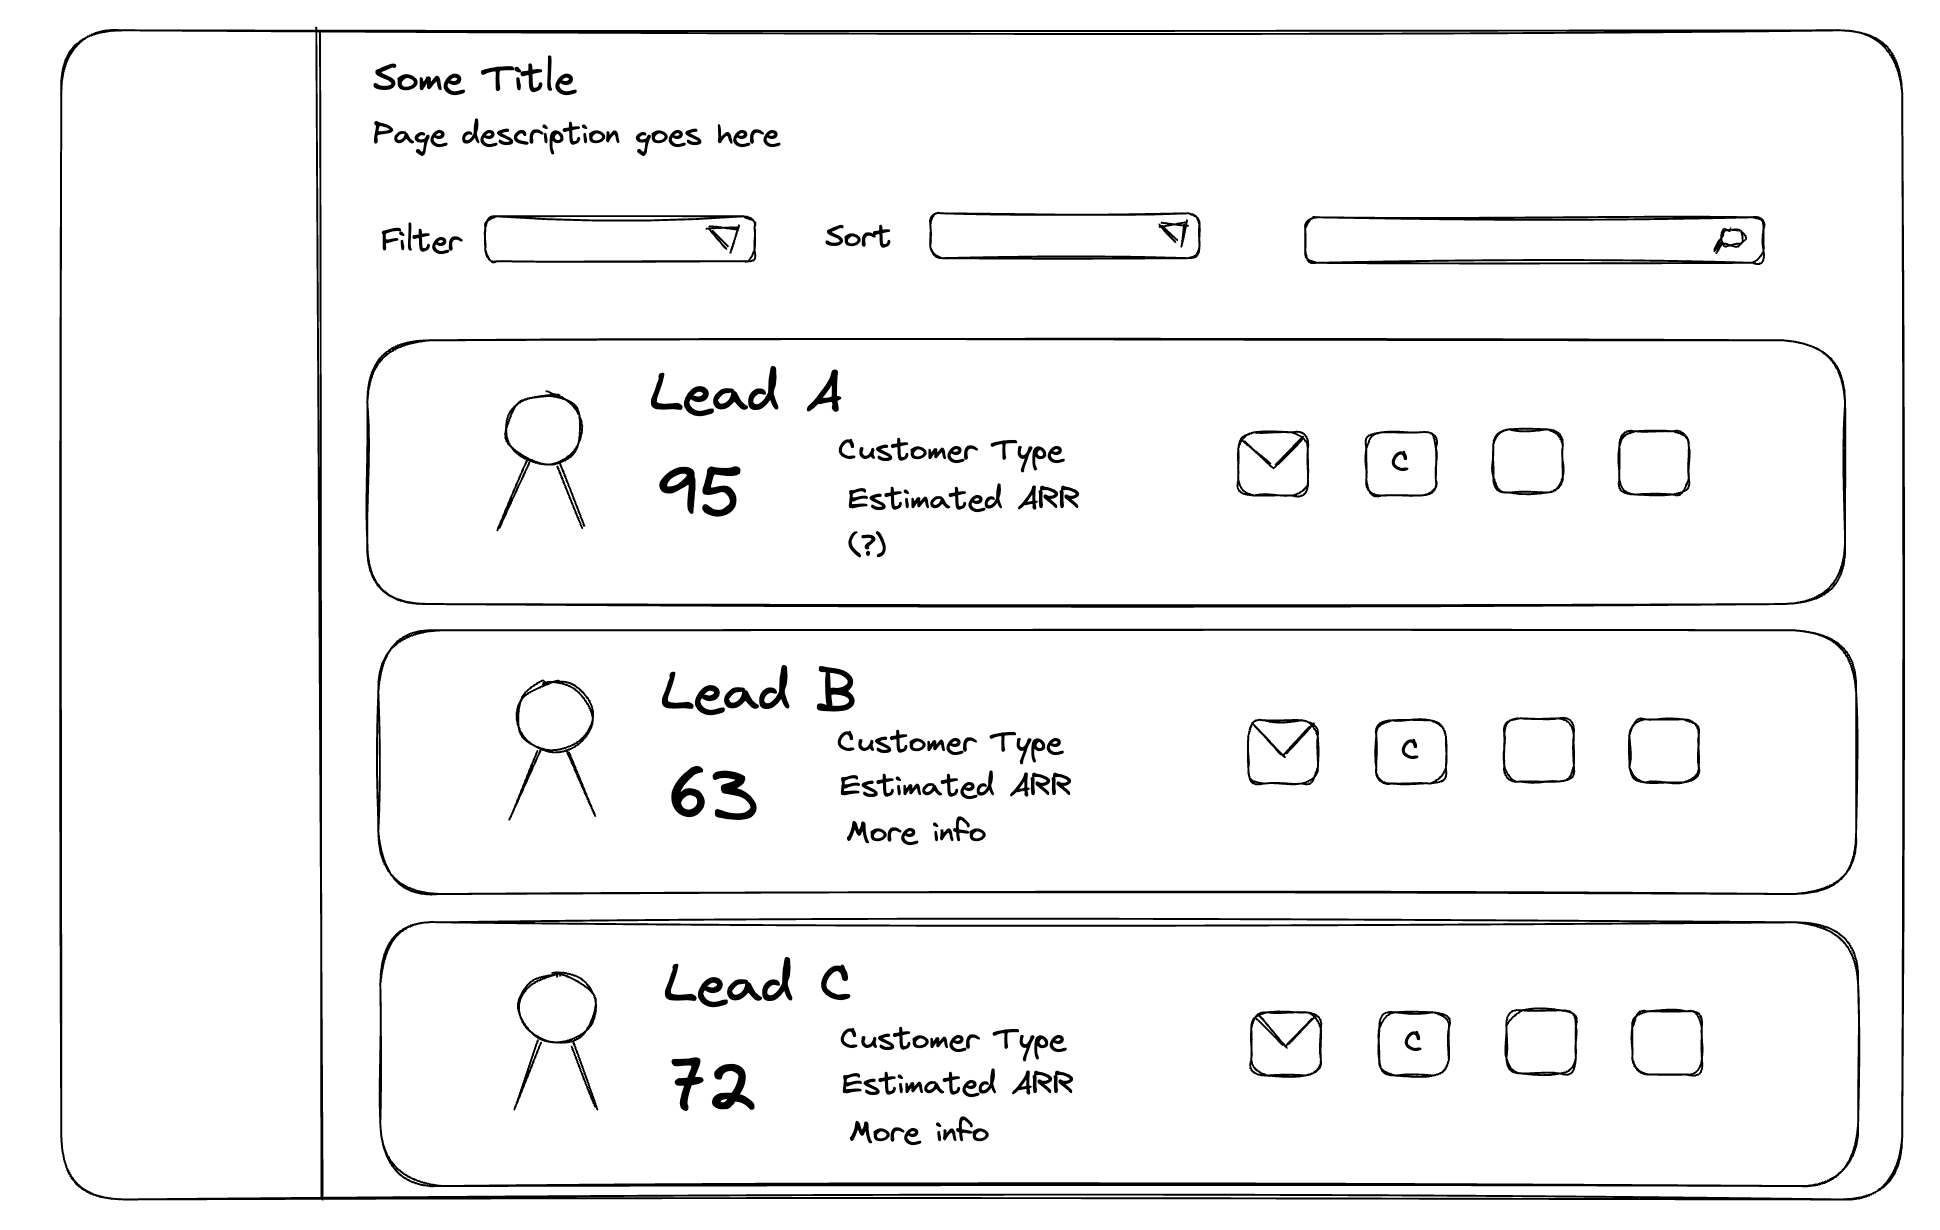
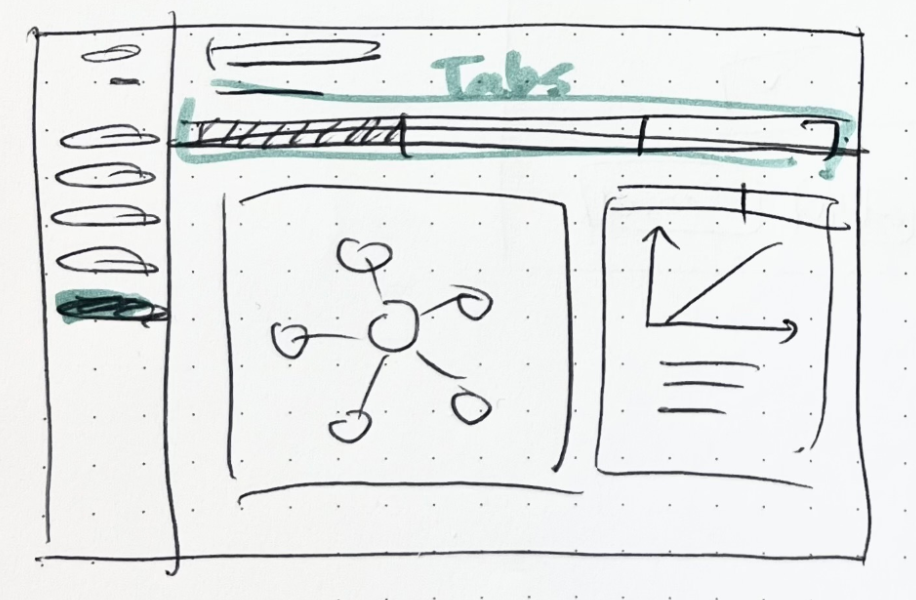
Example of the customer leads page with a list of potential customers and leads score. Showing a hand drawn and Excalidraw interpretations.

Hand DrawnExcalidraw

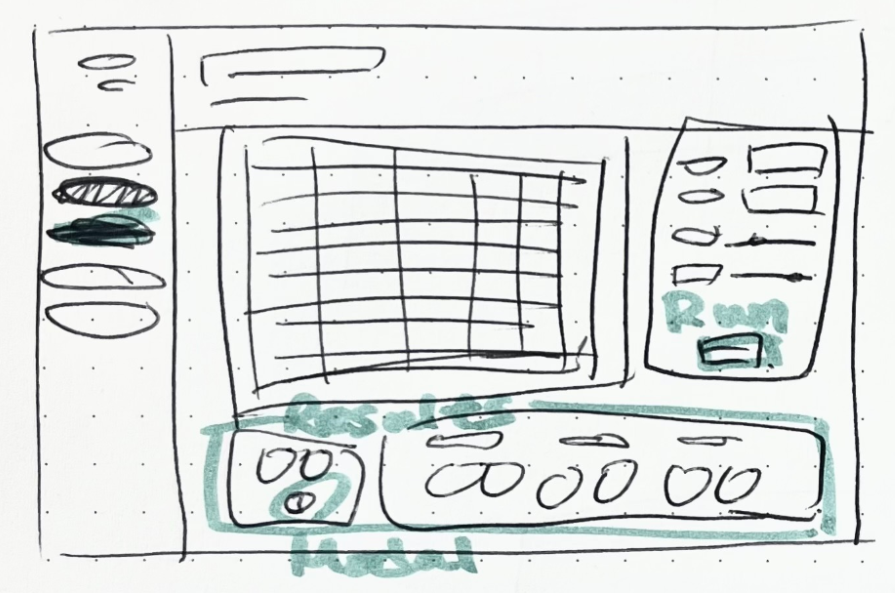
Customer retention page with a list of existing customers and possible actions for retention. Hand Drawn

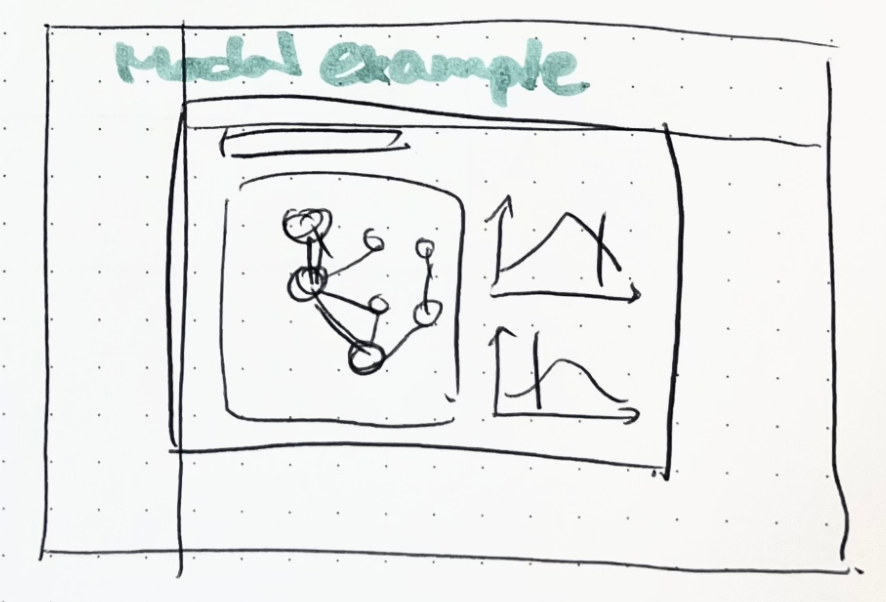
Modal for individual results explanation Hand Drawn

Model explanation page that showcases the model behind the suggestions. Hand Drawn

From design to an app

In this section you will go through the next step, converting the idea into an actual app. Depending on your coding style you may want to jump right into it. However if you are unsure you could always make a "shell app", that is add the components to the page without worrying about functionality.

Try a shell app

Shell apps allow for quick iteration of design, without having to worry about underlying logic. They are purely there to give you an idea of how an app might look like. This approach can also be quite useful in allowing you to see repeating patterns and help to structure your app without the extra layer of complexity that interactivity adds.

Customer Leads Customer Retention Modal 1 Modal 2 Model Explanation

Run user testing

To ensure that your app really serves its purpose, it is crucial to test it with the user throughout the entire process. By doing so, improvements can be found and implemented gradually, not having to be fixed at the last moment. There are numerous ways to test an app based on the development phase. For example, tests can be done even before anything is coded by simply asking the users for their thoughts while showing the wireframes. When a concrete artefact such as a shell app is available, thinking aloud is a great method to check usability. Thinking aloud is very easy to conduct and can collect rich data in a short period of time. Like this, conducting iterations of tests and improvement can enhance the quality of the app drastically.

Build with Dara

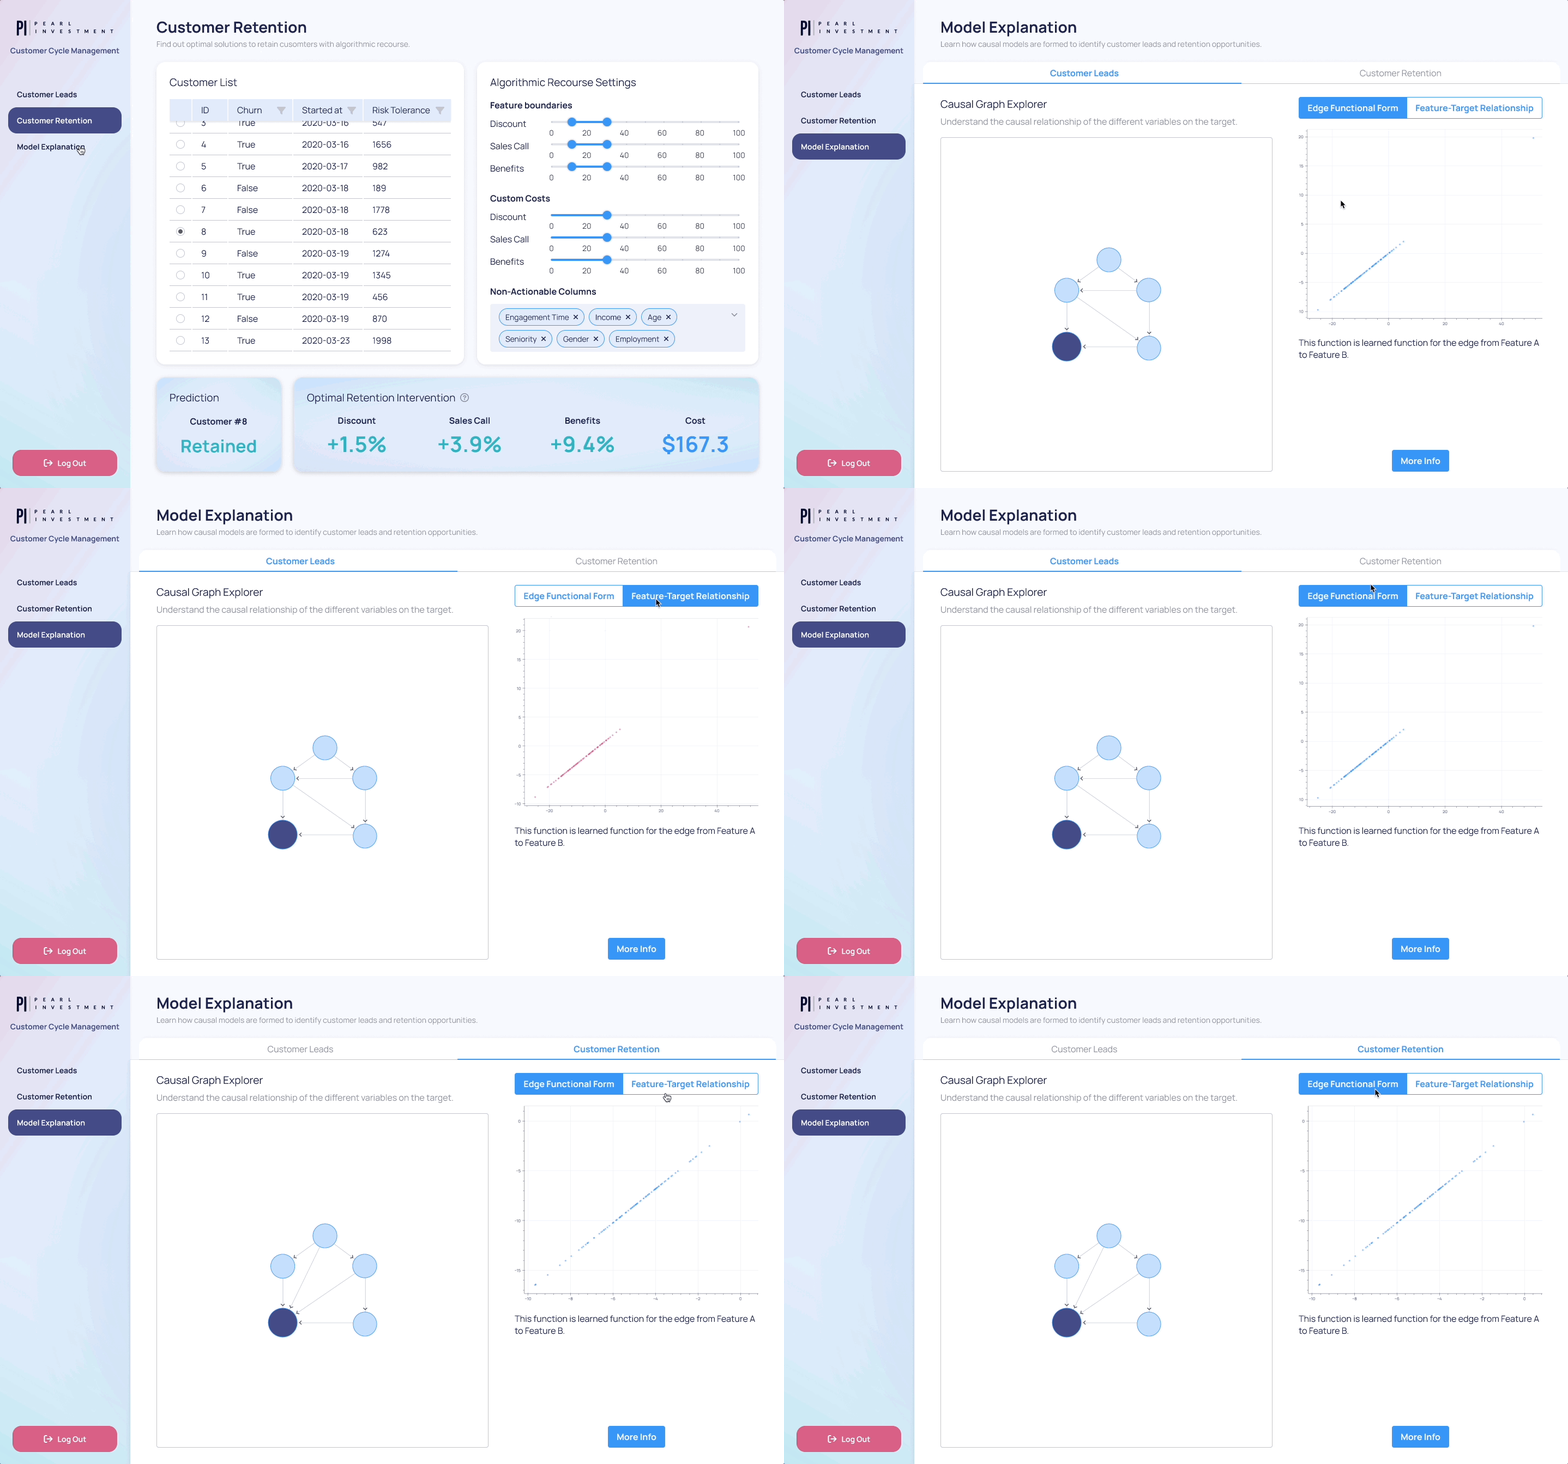
Now it’s the time to build your app with Dara! Dara provides various components which you can easily assemble using only python. The result is this beautiful, informative and interactive app. Stay tuned for an upcoming blog post where we will take you through the steps into making this a reality.

App1 App3 App2

Conclusion

In this deep-dive, you've navigated the complex yet rewarding process of designing a user-friendly app that offers insights to stakeholders interactively. Our journey began with identifying clear goals, understanding our users, and outlining our pages with relevant features. Then, the journey continued to sketch out plans with wireframes which can be brought to reality with Dara.

Remember, the processes discussed aren't necessarily linear and can be approached in any order. They can be adapted or even omitted based on your available resources and time. What's important is discovering a method that resonates with you and your team, and tailoring it to suit your unique needs.